Google Business Profiles has a form where you can report negative review extortion scams, the form launched a month ago. You can find access to the form in this help document and I believe you need to be logged into your Google account with access to the Business Profile you want to report.
Review extortion scams. This negative review extortion scams are on the rise and a huge concern for local SEOs and businesses. A scammer will message you, likely over WhatsApp or email, and tell you that they left a one-star negative review and the only way to remove it is to pay them.
Google wrote in its help document, “These scams may involve a sudden increase in 1-star and 2-star reviews on your Google Business Profile, followed by someone demanding money, goods, or services in exchange for removing the negative reviews.”
The form. The form can be accessed while logged into your Google account by clicking here. The form asks for your information, the affected Google Business Profile details, more details on the extortion review, and additional evidence.
Do not engage. Google posted four tips when you are confronted with these scams:
Do not engage with or pay the malicious individuals. This can encourage further attempts and doesn’t guarantee the removal of reviews.
Do not try to resolve it yourself by offering money or services.
Gather all evidence immediately. The sooner you collect proof, the better.
Report all relevant communication you receive in the form.
Give it a try. There are some who are doubtful that this form actually does anything. But one local SEO tried it out over the weekend and within a few days, the review in question was removed. So it is worth giving it a shot.
Why we care. Reviews on your local listing, especially on Google Maps and Google Search, can have a huge impact on your business. Negative reviews will encourage customers to look for other businesses, even if those reviews are fraudulent. So, being on top of your reviews and removing the fake and fraudulent reviews is an important task most businesses should do on an ongoing basis.
This form will help you manage some of those fake reviews.
https://i0.wp.com/dubadosolutions.com/wp-content/uploads/2025/11/broken-google-review-stars-1920-oKiQs8.jpg?fit=1920%2C1097&ssl=110971920http://dubadosolutions.com/wp-content/uploads/2017/05/dubado-logo-1.png2025-11-11 15:47:032025-11-11 15:47:03With negative review extortion scams on the rise, use Google’s report form
The label doesn’t matter nearly as much as understanding the shift behind it.
At the center of that shift lies one idea that explains everything: AI availability – and here’s why it matters.
What is AI availability?
The idea of AI availability comes from Byron Sharp, research professor at the Ehrenberg-Bass Institute, who introduced it in a comment on one of my LinkedIn posts.
Sharp’s work underpins modern brand science and shows that growth depends on availability.
Brands grow through sales, and sales grow through two kinds of availability: mental and physical.
Mental availability refers to the likelihood of being considered in a purchasing situation.
Physical availability refers to the ease and convenience with which an item can be bought.
For years, these two principles have guided brand strategy.
They explain why Coca-Cola invests in constant visibility and why Amazon makes every click lead to a checkout.
But in the era of generative search, there’s now a third kind of availability marketers need to understand – the likelihood that your brand or product will be recommended by an AI system when a user is ready to buy.
That is AI availability – and it changes everything.
AI as the new influencer
If you are still thinking of AI as a technology, you are already behind.
Think of it instead as the world’s most powerful influencer.
ChatGPT alone is used by about 10% of the global adult population, according to recent research from OpenAI, Harvard, and Duke.
That makes it far more pervasive than any social media platform at a similar stage in its life cycle.
Most people do not use it to code or write poetry – they use it to make decisions.
Nearly 80% of ChatGPT conversations, the same study found, fall into three categories:
Practical guidance.
Seeking information.
Writing.
In other words, people are asking AI to help them decide what to do, buy, and believe.
The study also shows that these conversations are increasingly focused on everyday decisions rather than work.
The distinction between search, research, and conversation is collapsing.
AI systems are now the gatekeepers of modern discovery. They decide what information to surface and which businesses appear in front of consumers.
Forget the Kardashians. Forget influencer marketing.
If you’re invisible to AI, you’re invisible to the market.
AI is the new influencer.
From keywords to fitness signals
The SEO industry has spent two decades optimizing for how humans search with keywords – but that is changing.
Large language models (LLMs) infer meaning from context, probability, and performance.
They are scanning for what we can call fitness signals – a term from network science.
Fitness describes a product or service’s inherent ability to outcompete rivals, allowing one business to dominate a market even if others started earlier or invested more.
Think of how Google overtook Yahoo.
It wasn’t just about better search algorithms – it was a better business model built on a stronger performance attribute: relevance.
These performance attributes are what make a business fit for survival. They are the qualities that define how well you solve a problem for a customer.
AI deploys search strategies to identify which businesses solve which problems most effectively.
Because it exists to serve human needs, those same signals determine your AI availability.
Yes, AI uses search strings, fan-out queries, and reciprocal rank fusion, among many other strategies and tactics.
It doesn’t search like humans because it isn’t bound by the same cognitive and speed limitations.
Humans search by “satisficing.” Keywords + Page 1 rankings = good enough.
Machines operate on an industrial scale – searching, gathering, assessing, and recommending.
To make your brand visible to machines that now mediate discovery, you need to understand how and where that visibility is built.
Start with a visibility audit
Diagnose your current presence.
Identify the category entry points most relevant to your products, and ask what prompts a user might type when they are ready to buy.
Tools such as Semrush’s AI Enterprise platform can simulate these scenarios and show where your brand appears.
Get listed where AI looks
Identify the sources that AI models reference.
Many LLMs use a mix of training data and live search, with listicles, directories, and “best of” articles among the most common data sources.
Being included in those lists is a sensible marketing strategy.
Just as supermarkets stock their own shelves with their best products, you should position your brand among the best available options.
Expand your owned ecosystem
Over time, you’ll find saturation points where every competitor appears in the same lists.
At that stage, innovation and owned media become essential.
Start your own publication, commission original research, and contribute to conversations in your category.
Create context that earns recommendations
Digital shelf space isn’t the problem. Credible context amplifies your fitness signals.
Efficient, data-led, and creative, this is GEO’s manufactured style. But its success depends entirely on having a brand worth recommending.
That’s why GEO is the outcome of proper marketing.
Still, it’s proper marketing with a specific focus: increasing the likelihood of being recommended by AI.
The future of visibility
SEO has always been about optimization.
GEO is about promotion – building and distributing enough credible, distinctive information about your business that an AI can recognize it as a trusted source.
The techniques look familiar: PR, branding, copywriting, partnerships, directories, and reviews.
The difference lies in intent. You’re not feeding a search engine – you’re training an intelligence.
This requires a new mindset.
You’re no longer optimizing for human users who type short queries into Google. You’re optimizing for a probabilistic model that interprets human intent across millions of contexts.
It doesn’t care about your title tags. It cares about whether you look like the right answer to a real problem.
GEO is both exciting and humbling.
It reconnects brand marketing and search after years of false division, and reminds us that while the tools evolve, the fundamentals endure.
You still need to be known, available, and distinctive.
And now your audience includes machines that think like humans but learn on their own terms.
Back to fundamentals, forward with AI
GEO is a return to marketing fundamentals seen through a new lens.
Businesses still grow by increasing availability.
Consumers still buy from the brands they notice and can easily access.
What has changed is the mediator: AI has become the primary distributor of attention.
Your task as a marketer is to make your brand’s performance attributes, category entry points, and distinctive assets visible in the data that AI consumes.
The goal hasn’t changed – to be chosen. Only the mechanics are new.
Because in the age of AI, the only brands that matter are the ones the machines remember.
https://i0.wp.com/dubadosolutions.com/wp-content/uploads/2025/11/The-three-pillars-of-brand-availability-A9cyga.png?fit=696%2C780&ssl=1780696http://dubadosolutions.com/wp-content/uploads/2017/05/dubado-logo-1.png2025-11-11 15:00:442025-11-11 15:00:44Why AI availability is the new battleground for brands
Keywords in reviews are generally believed to help local rankings, although their impact is still actively debated within the local SEO community.
Regardless of where the truth on ranking impact ultimately lands, keyword-rich reviews can still provide meaningful value for local SEO beyond pure rankings.
Below are seven reasons why you should still encourage keyword-rich reviews.
1. Review justifications
If your reviews consistently mention a keyword related to your business, the likelihood that your Profile will get a Review justification in search increases.
This visibility can boost click-through rates. Higher engagement may lead to a secondary improvement in search engine rankings.
2. Place Topics
Google creates clickable Place Topics from keywords in your reviews. These topics:
Highlight your specialties.
Filter reviews for customers.
Can boost your Profile’s engagement.
3. Review snippets
Google bolds frequently mentioned terms in three review snippets on the Business Profile. This draws users searching for those terms to your Profile, hopefully increasing click-through rates.
4. Menu Highlights (restaurants)
The Menu Highlights are generated from customer reviews and photos, similar to Place Topics.
Keywords in reviews impact the Menu Highlights section.
Therefore, when you get a menu highlight for a term mentioned in your reviews, you should rank better for that term.
5. AI editorial summaries
Google’s AI-generated business summaries pull concepts from reviews (e.g., “cozy”) to describe your business.
While Google’s AI summaries aren’t something you can edit, encouraging customers to include specific keywords in their reviews could influence the AI to emphasize aspects most beneficial to your business.
6. AI review summaries
Google’s AI generates review summaries by analyzing common sentiments and tips from customer feedback.
If your customers mention the right keywords in their reviews, your review summary will appear more compelling.
7. Ask Maps about this place feature
Google is phasing out the old Q&A section and replacing it with an AI-powered feature that pulls answers from customer reviews.
This means reviews with detailed info (and the right keywords) are more valuable than ever.
How do you get keywords in your reviews?
It does not make sense to directly ask your customers, “Can you please add [keyword] to your review?” It’s unnatural and weird and will leave the customer wondering what your deal is.
But that doesn’t mean you have no options.
To encourage customers to naturally include relevant keywords in their reviews, begin by upgrading your review request templates.
Miriam Ellis recently wrote a helpful guide all about how to get keyword-rich reviews, which also includes three review request templates to make it extra easy for every business owner.
These templates guide customers on what to say, encouraging longer, more detailed, keyword-rich reviews — and can even prompt them to add photos to their reviews.
Here are three of those templates:
Scenario 1: Requesting reviews of specific products
Hi [customer name], I’m [your name and job title] from [company name], and I’m writing to check in with you on your purchase of [product]. It’s my job to be sure you’re satisfied, and I wondered if you would be willing to provide your feedback in a review at [link]? I’m enclosing a photo of [product] for your use in your review if you don’t have your own photo, and I’d be so grateful if you could review your experience with: – The features of this product that stand out most to you– What you like or dislike about it– How you’ve been using the product since you purchased it If there’s anything we could have done better for you, please feel free to contact us directly at [phone number or feedback form link]. I want to be sure you’re fully satisfied and we’re so grateful for your business. Thank you very much if you can take the time to tell us about your personal experience in your review. [review us here link or button] Sincerely,[name, job title, business]
Scenario 2: Requesting reviews of specific services
Hello [customer name], This is [your name and job title] from [company name], and we were so happy to [service provided]. It’s my job to be sure you’re satisfied, and I wondered if you would be willing to provide your feedback in a review at [link]? I’m enclosing a photo of [the service that was provided] for your use in your review if you don’t have your own photo, and I’d be so grateful if you could review your experience with: – Whether the service met your expectations– What you like/dislike about the service– How we did with our customer service If there’s anything we could have done better for you, please feel free to contact us directly at [phone number or feedback form link]. I want to be sure you’re fully satisfied, and we’re so grateful for your business. Thank you very much if you can take the time to tell us about your personal experience in your review. [review us here link or button] Sincerely,[name, job title, business]
Scenario 3: Requesting reviews when you’re not sure what a customer purchased
Email template
Hello [customer name], Thank you for being our customer. I’m [your name and job title] from [company name], It’s my job to be sure you’re satisfied, and I wondered if you would be willing to provide your feedback in a review at [link]? I’m enclosing a photo of [the business premises] for your use in your review if you don’t have your own photo, and I’d love it if you could review: – Whether you found our customer service helpful– What you like/dislike about our store– Why you chose our store If there’s anything we could have done better for you, please feel free to contact us directly at [phone number or feedback form link]. I want to be sure you’re fully satisfied and we’re so grateful for your business. Thank you very much if you can take the time to tell us about your personal experience in your review. [review us here link or button] Sincerely,[name, job title, business]
Now, make it work for you
By implementing a few simple improvements in your review requests, you will receive more detailed reviews from your customers, and their enhanced feedback will provide numerous benefits.
You may even increase your Google rankings for additional keywords, but I can’t guarantee anything. With all the other benefits, rankings shouldn’t be your primary goal anyway.
https://i0.wp.com/dubadosolutions.com/wp-content/uploads/2025/11/plumbing-google-review-justifications-y1aXp1.webp?fit=1999%2C974&ssl=19741999http://dubadosolutions.com/wp-content/uploads/2017/05/dubado-logo-1.png2025-11-11 13:00:002025-11-11 13:00:007 local SEO wins you get from keyword-rich Google reviews
Over 2.5 million home services businesses operate in the U.S., from HVAC companies and plumbers to pest control specialists and landscapers. Most compete within a 10-15 mile radius, fighting for the same local customers.
Here’s the problem: your potential customers need help right now. A burst pipe. A broken AC in July. A wasp nest over the front door. They’re Googling “emergency plumber near me,” asking ChatGPT for recommendations, or searching through Google’s AI Overviews for “same-day HVAC repair.” They’re calling the first business that looks trustworthy.
If you don’t show up in those searches, either traditional Google results or AI-generated answers, with strong reviews and clear contact info, you’ve already lost the job.
Home services marketing gets you in front of customers at the exact moment they need you, across every platform they’re using. This guide breaks down the specific tactics that work for local service businesses.
Key Takeaways
Home services marketing drives visibility when customers search during emergencies or urgent needs in your local area.
Reviews and your Google Business Profile directly impact whether customers call you or scroll to the next listing.
Effective home services marketing combines local SEO, paid search for high-intent keywords, and reputation management.
Mobile-optimized websites with click-to-call functionality are critical since most home services searches happen on phones.
AI search tools like ChatGPT and Google’s AI Overviews now influence how customers find local service providers.
Tracking call volume, form submissions, and cost per lead helps you invest in what actually brings customers through the door.
Why Do Home Services Businesses Need Marketing?
Referrals and repeat customers built your business. But what happens when your best referral source retires? Or when a new competitor opens two miles away and starts undercutting your prices?
Marketing creates a predictable lead pipeline that doesn’t depend on word-of-mouth alone.
Here’s what effective marketing does for home services businesses:
Generates leads during slow seasons. HVAC companies can’t survive on summer AC calls alone. Marketing keeps your calendar full with maintenance appointments, system upgrades, and off-season work.
Captures customers before they call your competitor. When someone searches “24-hour electrician,” three businesses appear in Google’s map pack. Marketing gets you in that top three instead of buried on page two.
Look at the example below. These three electricians dominate the local map pack for emergency searches. Notice how each has over 100 reviews, clear phone numbers, and “Open 24 hours” indicators. The businesses below this fold get far fewer calls.
Builds pricing power through reputation. When you have 200+ five-star reviews and your competitor has 15, customers stop shopping on price alone. They’ll pay more for the business that looks trustworthy and established.
Lets you choose your customers. Good marketing attracts the right jobs at the right price points. You’re not just taking whatever walks through the door.
Without marketing, you’re reacting. With it, you’re in control of your growth.
What Makes Home Services Marketing Unique?
Home services marketing operates differently than retail, ecommerce, or B2B software. You’re selling an in-person service that requires customers to let strangers into their homes, often during stressful situations.
That creates three unique challenges:
Hyper-local competition. You’re not competing nationally. You’re fighting for visibility against 15-30 other plumbers, electricians, or HVAC companies within a 10-mile radius. Your customer in Austin doesn’t care about the best roofer in Dallas.
Trust is the primary buying factor. Customers research your business before opening their door. They check if you’re licensed, read what other homeowners say about you, and look for proof you won’t rip them off or do shoddy work.
Look below for an example of what customers see when researching a home services business. This HVAC company’s Google Business Profile displays detailed reviews mentioning specific technicians and response times. These trust signals matter more than flashy branding.
Speed matters more than polish. Most home services searches are urgent. Customers need someone today, not next week. They’ll call the first business that answers the phone and can schedule them quickly. A beautiful website means nothing if your contact info is buried or your phone goes to voicemail.
Click-to-call buttons on every page, above the fold.
Service area pages for each city or neighborhood you cover.
Real customer photos showing your team, trucks, and completed work.
Fast page load times because impatient customers bounce quickly.
Digital Marketing Strategies For Home Services
Winning in local home services marketing requires a mix of visibility tactics and trust-building. You need customers to find you when they search, trust you enough to call, and remember you for future jobs.
The strategies below work specifically for home services businesses. Each section covers what the tactic does, why it matters for local service companies, and how to implement it without wasting money on tactics built for other industries.
Home Services LLM Marketing
Large Language Model (LLM) marketing optimizes your content to appear in AI-generated search results from tools like ChatGPT, Claude, Perplexity, and Google’s AI Overviews.
When someone asks ChatGPT “Who’s the best emergency plumber in Austin?” or uses AI Overviews to search “how to choose an HVAC company,” you want your business cited in those responses.
Answer specific questions clearly. Create content that directly answers common home services questions: “How much does furnace replacement cost in Chicago?” or “What causes low water pressure?” AI tools favor content that gets straight to the answer in the first paragraph.
Use structured data markup. Add schema markup (LocalBusiness, FAQPage, HowTo) to help AI understand your services, location, and expertise. This increases your chances of being cited as a source.
Build authority with detailed guides. Publish comprehensive resources like “Complete Guide to Emergency Plumbing Repairs” or “HVAC Maintenance Checklist for Homeowners.” AI models pull from authoritative, in-depth content when generating recommendations.
Check out this Google’s AI Overview for landscaping companies near Seattle. These businesses earned placement by creating structured, authoritative content that AI can parse and reference.
Claim and optimize your Google Business Profile. AI tools often reference Google’s local business data when making recommendations for service providers.
Home Services Content Marketing
Content marketing for home services means creating blog posts, videos, and guides that answer customer questions, build trust, and improve your local SEO rankings.
Customers research before calling. They want to know what the job costs, how long it takes, and whether they can trust you. Content answers those questions and positions you as the expert.
What works for home services:
Location-specific service pages. Create dedicated local landing pages for each service in each city you cover: “Emergency Plumbing in Austin, TX” or “AC Repair in Round Rock.” Include local details like average response times, areas served, and city-specific regulations.
Educational blog posts targeting search queries. Answer questions customers actually ask: “How do I know if my water heater needs replacing?” or “Why is my AC blowing warm air?” These posts drive organic traffic and demonstrate expertise.
Video content showing your work. Film your technicians diagnosing problems, completing repairs, or explaining maintenance tips. Video builds trust faster than text. The River Pools YouTube channel is a good example, showing repair tutorials and walkthroughs..
FAQs on every service page. Add 3-5 frequently asked questions at the bottom of each service page. This helps with SEO and reduces pre-call questions.
Paid Media for Home Services
Paid search (PPC) puts your business at the top of Google instantly, above the map pack and organic results. For urgent home services searches, paid ads capture customers who need help now and will call the first number they see.
Home services keywords are expensive. “Emergency plumber” or “AC repair near me” can cost $15-$75 per click in competitive markets. That’s why your campaigns need tight targeting and strong conversion tracking.
Here are some best practices for home services PPC:
Target hyper-local, high-intent keywords. Bid on “emergency electrician in [neighborhood]” or “same-day HVAC repair [city].” Skip broad terms like “plumbing tips” that attract researchers, not buyers.
Use call extensions and location extensions. Make your phone number and address visible in every ad. Most home services customers call directly rather than visiting your website first.
Run call-only campaigns for mobile. Over 70% of home services searches happen on phones. Call-only ads display just your phone number and business info with a tap-to-call button.
In the paid ads for “emergency plumber NYC,” you can see book buttons, star ratings, and location info. Notice how these ads dominate the top of results before any organic listings appear.
Track phone calls, not just clicks. Use call tracking software like CallRail to measure which keywords drive actual phone inquiries and booked jobs.
Home Services SEO
SEO (search engine optimization) helps your business rank organically in Google without paying for every click. For home services, local SEO drives the most valuable traffic because customers search for providers in their immediate area.
Local SEO focuses on appearing in the map pack (the top three businesses with pins) and ranking for city-specific keywords. Getting into that map pack means more calls.
How to optimize local SEO for home services:
Optimize your Google Business Profile completely. Fill out every section: business description, service areas, hours, attributes (veteran-owned, emergency services, etc.), and upload at least 10 photos. Add posts weekly to stay active.
Create dedicated pages for each service and location. If you serve five cities, create five separate pages for “AC Repair in [City].” Include local landmarks, neighborhoods, and zip codes in your content.
Build local citations. Get your business listed on Yelp, Angi, BBB, Chamber of Commerce, and industry directories. Consistent NAP (Name, Address, Phone) across all sites signals legitimacy to Google.
The example below shows a location-specific service page optimized for local SEO. Notice how the plumbing company includes the city name in the H1, mentions specific neighborhoods served, references local weather patterns, and includes a map showing their service area.
Optimize for mobile speed. Run your site through Google PageSpeed Insights and fix any issues slowing load times. Slow sites lose impatient mobile customers.
Social Media For Home Services
Social media for home services builds local recognition and trust. You’re not trying to go viral. You’re staying visible so customers think of you first when their water heater breaks or their AC stops working.
Focus on Facebook and Instagram for residential customers, and add YouTube for educational content. LinkedIn works if you target commercial property managers or businesses.
What works for home services social media:
Post before-and-after photos of completed jobs. Show the clogged drain versus the clean pipe. The old HVAC unit versus the new installation. Visual proof builds credibility and gives customers confidence in your work quality.
Share customer testimonials and video reviews. Ask satisfied customers to record a 30-second video explaining their experience. Video testimonials feel more authentic than text reviews and perform better on social platforms.
Show your team and trucks in action. Post photos of your technicians arriving at jobs, working on repairs, or attending training. This humanizes your business and helps customers recognize your branded vehicles in their neighborhood.
The example below shows a foundation repair company’s Instagram feed with informational content, team photos, and customer shoutouts.
Engage with local community content. Share local events, sponsor youth sports teams, or highlight neighborhood news. This positions you as a community business, not just a service provider.
Post 3-4 times per week minimum. Consistency matters more than perfection.
Email Marketing For Home Services
Most home services businesses ignore email marketing, which leaves money on the table. Email keeps you connected with past customers and turns one-time jobs into repeat business.
Home services have natural repeat cycles. HVAC systems need annual maintenance. Gutters need cleaning twice a year. Pest control requires quarterly treatments. Email reminds customers to book before they call someone else.
How to use email for home services:
Send seasonal maintenance reminders. Email past customers in April about AC tune-ups before summer heat. In October, remind them about furnace inspections before winter. These emails generate easy repeat bookings.
Automate post-job follow-ups. Three days after completing a job, send an automated email asking for a review with direct links to your Google Business Profile. Follow up 30 days later with maintenance tips or related service offers.
Share monthly tips in newsletters. Send seasonal advice like “How to prevent frozen pipes” or “Signs your water heater is failing.” Educational emails keep you top-of-mind without being pushy.
The screenshot below shows a house cleaning company’s new stripping and waxing service seasonal email reminding customers to book spring maintenance. Notice the clear call-to-action button, features, and service photos.
Win back inactive customers. Email customers who haven’t booked in 12+ months with a special offer.
Home Services Reputation Management
Your online reputation directly impacts whether customers call you or scroll to the next business. Studies show 97% of consumers read customer reviews before choosing a local service provider. For home services, where customers invite strangers into their homes, reviews matter even more.
A competitor with 150 five-star reviews will get calls over you, even if your prices are lower and your service is better. Reputation management isn’t optional.
How to manage your reputation:
Ask for reviews immediately after completing jobs. Send a text or email within 24 hours with direct links to your Google Business Profile and Yelp. Happy customers forget to leave reviews if you wait too long. Make it easy with one-click links.
Respond to every review within 48 hours. Thank customers for positive reviews and mention specific details (“Glad Tom could solve your drainage issue so quickly”). For negative reviews, respond professionally, acknowledge the problem, and offer to make it right offline.
Display reviews prominently. Add a reviews widget to your website homepage. Screenshot your best Google reviews and share them on social media. Ideally, you should have as many ways as possible to feature testimonials.
Monitor mentions across platforms. Use tools like Podium, Birdeye, or Google Alerts to track when your business is mentioned online.
Home Services Mobile/SMS Marketing
SMS marketing works exceptionally well for home services because customers open 98% of text messages within minutes. For time-sensitive communications like appointment confirmations and service updates, texting beats email every time.
How home services use SMS effectively:
Send appointment confirmations and reminders. Text customers 24 hours before scheduled service: “Reminder: Tom will arrive tomorrow at 2pm for your AC repair. Reply C to confirm or R to reschedule.” This reduces no-shows significantly.
Update customers on technician arrival. Text “Your technician is 15 minutes away” when your crew is en route. This courtesy builds trust and reduces anxious phone calls asking “Where are you?”
Request reviews via text. Send a review request within hours of completing a job: “Thanks for choosing us! How did we do? Leave a review: [link].” SMS review requests get 3x higher response rates than email.
Send seasonal promotions to past customers. Text previous clients with limited-time offers: “Spring AC tune-up special: $79 (reg $129). Book by 4/30. Reply BOOK to schedule.”
Keep messages short, personalized, and always include an opt-out option to stay compliant with
Measuring Your Home Services Marketing Success
Tracking results tells you what’s working and where to invest more budget. Home services businesses should focus on metrics that directly tie to revenue: calls, bookings, and cost per customer.
Key metrics to track:
Phone call volume and source. Use call tracking software like CallRail or CallTrackingMetrics to see which marketing channels drive calls. Tag different phone numbers for your website, Google ads, and Facebook page to identify your best sources.
Form submissions and online bookings. Track how many people fill out contact forms or book appointments through your website. Set up conversion tracking in Google Analytics to measure this.
Google Business Profile insights. Check your profile’s dashboard monthly to see how many people viewed your listing, clicked for directions, called your business, or visited your website. This shows your local visibility trends.
Cost per lead and cost per customer. Calculate how much you spend to acquire each lead and each paying customer. If your Google ads cost $2,000/month and generate 40 leads with 10 becoming customers, your cost per customer is $200.
The screenshot below shows a CallRail dashboard tracking phone calls by source. Notice how it attributes calls to specific campaigns (Google Ads, organic search, Facebook) so you know exactly what’s driving results.
Use Google Analytics, Ubersuggest, and your CRM to centralize this data in one dashboard.
FAQs
What is home services marketing?
Home services marketing is the process of promoting businesses like HVAC, plumbing, roofing, pest control, and other similar categories. It includes strategies like SEO, paid ads, local listings, email, and referral programs to attract and retain customers.
How to market home services?
Start with the basics: claim your Google Business Profile, build a review strategy, create local SEO-optimized service pages, and run targeted PPC campaigns. From there, test channels like email and SMS to nurture leads and win repeat business.
Conclusion
More leads, more reviews, and a full calendar don’t happen by accident. Home services marketing builds the visibility and trust that turn searchers into paying customers.
Start with local SEO and your Google Business Profile. These give you the foundation to appear when customers search for help. Add customer reviews to build credibility, then layer in paid ads and content to capture customers at every stage.
Track your results monthly. Know which channels drive calls and which waste budget. Double down on what works.
If you need help building a marketing strategy that fills your schedule, NP Digital works with home services businesses to create campaigns that generate real ROI.
Managing local search marketing for one location is straightforward.
But managing multi-location SEO — whether it’s 10, 50, or 100 branches — gets complicated fast.
Each location needs unique content.
A single mistake in your business info can mislead customers and hurt trust.
And it’s tough to see which branches are actually driving results.
Everything changes when you’re managing SEO for multiple locations.
Our six-step system below tackles these challenges in order of priority.
You’ll learn exactly how to:
Create high-performing location pages
Optimize Google Business Profiles (GBPs) across every branch
Manage reviews, citations, and backlinks efficiently
Track performance by location to see what’s really working
Plus, you’ll get our free toolkit to help you build a scalable SEO strategy for multiple locations.
Let’s dive in.
Step 1. Create Location Landing Pages
Every branch needs its own home online.
Without a dedicated location landing page, your GBP has nowhere reliable to link. And customers looking for local hours, directions, or services may bounce straight to a competitor.
So, start by confirming the basics.
Talk with branch managers or franchise owners to verify core business details — official name, address, phone number, operating hours, and available services.
Copy our location details sheet and use it to gather and confirm accurate data for every branch.
Once it’s filled out, this sheet becomes your single “source of truth” — helping you prevent endless downstream errors when managing dozens of listings and citations later on.
Do Location-Focused Keyword Research
Once you’ve gathered accurate data, move into keyword targeting.
Each page should focus on one primary keyword set that combines your core service with its city or neighborhood modifier (e.g., “dentist in Austin”).
Doing this avoids keyword cannibalization between branches while signaling clear relevance for local searchers.
To scale efficiently, create a modular framework for every location page. This ensures consistency across branches while letting you customize local details.
Start with a simple, SEO-friendly URL structure.
Use subfolders (e.g., example.com/locations/austin).
Why?
They inherit more domain authority and are easier to maintain across large sites.
Each page should include these essential content blocks:
Name, address, and phone number (NAP)
An embedded map and clear driving directions
Local photos and customer reviews
A concise overview of services offered
A strong, localized call to action
Once your template is set, link to these pages internally so search engines and users can easily find them.
Add links from your main navigation or a dedicated HTML sitemap, and cross-link between related locations or service pages when relevant.
This type of modular setup helps every page stay on-brand while still serving unique, location-specific content.
Want a shortcut?
That’s where our Location Page Template comes in.
It’s a plug-and-play framework that keeps pages consistent while giving you room to localize copy, visuals, and CTAs.
Instead of rebuilding from scratch, just fill in the blanks and launch pages faster.
Publish Unique, Optimized Content
Even with templates, every location page should feel distinct and relevant to its community. Boilerplate content can hurt engagement and limit your local visibility.
So, add local flavor wherever you can — photos of the branch exterior or team, nearby landmarks, or community involvement.
These small touches make each page authentic and help prevent duplicate content issues.
But don’t just stop there.
Rotate seasonal offers, update photos, and feature new testimonials to show both search engines and customers that your locations are active and trusted.
Finally, dial in your SEO details.
Titles, headers, image alt text, and LocalBusiness schema should all include the branch’s city or neighborhood.
These signals help Google connect each page to the right local search intent.
Pro tip: Start with your highest-traffic or flagship markets first. Once those pages are performing, use the same structure and workflow and apply it to the rest.
Step 2. Build and Optimize Google Business Profiles for Every Location
Multi-location SEO starts with accuracy and consistency in your GBPs.
One wrong detail — or a suspended profile — can tank visibility for that branch. And when you’re handling dozens of listings, a small mistake can spread fast.
Next, check every listing against your master spreadsheet from Step 1.
Make sure the name, address, phone number, hours, and landing page URL all match. Even one typo can hurt rankings.
Then, add UTM tracking to your website links.
This lets you see which branches drive traffic, leads, and sales in Google Analytics (GA4) or your customer relationship management (CRM) system.
Optimize Your GBPs Completely
Verification is just the start.
If you’re doing SEO for multiple locations, it’s not a one-time job — it’s a system you have to run efficiently across every branch.
Start with categories.
One wrong choice can confuse Google, so build a shared list of approved options every branch can use.
Precision matters more than volume. So, pick one main category and a few secondary ones that match what that branch actually offers.
Not sure which categories competitors use?
Tools like GMBspy show the primary and secondary categories of top-ranking businesses in your market.
From there, focus on consistency and automation across every profile:
Standardize visuals: Give each manager a short photo checklist (e.g., storefront, interior, team, and one or two local highlights) to keep listings current.
Use a brand-approved description template: Maintain a consistent tone but personalize each listing with local details.
Keep data aligned: Hours, URLs, and phone numbers should always match your website and location pages. Even one mismatch can cause issues across your network.
Automate updates: Tools like Semrush Local or BrightLocal can push edits, track reviews, and monitor changes in bulk.
Pre-load FAQs: Seed each profile’s Q&A section with verified, brand-approved answers before customers fill in the gaps.
Pro tip: Want to make life easier? Use our GBP optimization checklist to stay consistent across every location.
Post and Update Regularly
Google rewards freshness.
Regular posts, photos, and updates show that your business is active. And they help each location stand out in Maps and the local pack.
Share short posts for promos, events, and new services. Rotate new photos or short videos every few months to keep your listings looking current.
Even small updates like adding seasonal offers or highlighting staff can make a difference in clicks and calls.
And don’t forget the Q&A section.
Add common customer questions yourself with accurate, brand-approved answers. Then, monitor it regularly so you can respond fast when new ones appear.
The hard part?
Doing this for dozens — or hundreds — of branches. Manually updating each profile is exhausting and easy to fall behind on.
Tools like Semrush Local can make it easier by letting you manage posts, photos, and info for all your locations from a single dashboard.
Step 3. Collect and Manage Reviews
Reviews drive both rankings and trust.
At scale, the challenge isn’t getting one review — it’s managing hundreds across locations every month without dropping the ball.
Automate Review Acquisition
Start by collecting customer contact info at checkout or after service.
That lets you send automated review requests by text or email through your point of sale (POS) system or CRM.
Each branch should have its own short review link or QR code so customers can find the right profile fast.
Add those links to receipts, follow-up emails, and even in-store signage. Small touches like that can boost response rates over time.
Most customers don’t ignore review requests on purpose, they just forget.
A simple reminder can make a big difference in review volume.
Centralize Review Monitoring
Tracking reviews one branch at a time wastes hours.
Set alerts for negative reviews so you can respond quickly and win back unhappy customers.
Over time, you’ll start spotting trends — like which cities get the most reviews or which teams need more support.
Standardize Responses
Consistency matters as much as speed.
Create a few brand-approved templates for positive, neutral, and negative reviews. Then, teach local staff how to personalize them with names or specific details from the customer’s experience.
Small touches like that make responses feel authentic while staying on brand.
You can also make a copy of our Review Response Templates to speed things up and keep messaging consistent.
The goal is to sound human without going off-script. That balance keeps your tone aligned across every branch while still making each customer feel heard.
List the official name, address, phone number, hours, Google Business Profile URL, and landing-page URL for every location.
Keep it updated — this one file keeps every branch aligned.
Next, make it easy to see what’s current and what’s not. Use the “Last Verified” column to track when each location’s details were last checked.
If different people manage different regions, assign ownership right in the sheet. That one small habit prevents duplicate edits and conflicting updates later on.
Automate Distribution
Once your data is solid, automation makes running multiple locations easier and saves hours of manual updates.
They also make it easy to update details like hours, phone numbers, and URLs whenever something changes.
Audit and Monitor Listings Regularly for Accuracy
Your listings won’t stay accurate forever. That’s where routine maintenance makes all the difference.
Run a quarterly NAP audit to catch inconsistencies before they snowball. Your listings tool can scan every profile and flag details that don’t match your master sheet.
Then, spot-check the platforms that matter most: GBP, Apple Maps, Yelp, and Facebook. If you’re in a specialized industry, check directories like ZocDoc or FindLaw, too.
Keep a running log of what you fix each quarter.
Over time, patterns will reveal which platforms or regions slip most often. That insight helps you tighten your process and prevent repeat issues.
Step 5. Build Local Backlinks That Actually Move the Needle
With one location, a few chamber of commerce links or directory listings can boost authority.
But when you’re managing dozens of branches, growing that process across your entire network takes more than luck. It takes systems.
Focus on Community and Local Partnerships
Local links help boost visibility and build trust.
They show that real people in each community engage with your business.
So, encourage branch managers to get involved. Sponsor events, join community groups, or collaborate with nearby businesses.
These efforts often lead to natural mentions and backlinks that show local relevance to search engines.
To streamline the process, collect ideas that work and turn them into a shared playbook.
Pro tip: Use your location landing pages as link destinations instead of the homepage. They’re more relevant to searchers in each market and can strengthen those pages’ ability to rank locally.
Systematize Outreach
Multi-location SEO relies on repeatable systems that make expansion easier.
Document what’s working so every branch can replicate it.
Use our Local Backlink Opportunity Tracker as your central database to log outreach, track live links, and measure results across all locations.
Add notes on what type of partnership or content earned each link so others can reuse the same playbook.
Centralize research at the brand level to save time. Identify sponsorship pages, community events, and local publishers that align with your audience before branches start outreach.
Over time, you’ll start to see what works best.
Certain link types, partner categories, or content formats will consistently deliver stronger results.
Use those insights to refine your playbook and make link acquisition faster, easier, and more predictable across your entire network.
Use Tools to Prioritize and Track
Link research tools come to the rescue in automating link opportunity discovery for every branch.
Start with Semrush’s Backlink Analytics to see which local websites link to your competitors. Those same sponsors, media outlets, and directories are strong prospects for your own branches.
You can also build city-specific prospect lists using searches like “our sponsors” + city name or “community partners” + city.
Try prompting AI tools like ChatGPT or Google’s AI Mode to surface local organizations, events, and publications worth contacting.
Review your data regularly to see which branches or regions are earning coverage and which need extra support.
If some locations have fewer opportunities, that’s normal.
Smaller towns and rural areas often have limited local media or sponsorship options. In those cases, expand your search to nearby cities or regional publishers.
Step 6. Track and Attribute Performance by Location
Tracking performance can get complicated, especially when you’re running a local SEO strategy for multiple locations.
Without clear attribution, you can’t prove which branches — or tactics — are driving results.
Use UTMs + Location IDs Everywhere
Building a consistent local SEO strategy for multiple locations means tracking every branch the same way — from clicks and calls to conversions and revenue.
Multi-location tracking starts with structure.
Add UTM tags to every GBP link, ad campaign, and email.
They make it possible to separate traffic, leads, and conversions by branch inside GA4 and your CRM system.
Use a clear naming convention so you can filter results without digging through rows of messy data.
Phone calls and form fills are two of the strongest conversion signals in local SEO.
Don’t lose them in a generic tracking setup.
Use tools like CallRail to assign unique phone numbers to each branch. That way, you can see which campaigns and locations are driving calls directly from search or ads.
For web forms or booking widgets, embed hidden location IDs so submissions are tagged automatically to the right branch. It takes a few minutes to set up, but it eliminates hours of manual cleanup later.
Centralize in a Multi-Location Dashboard
You can’t improve what you can’t measure.
Use a platform like Looker Studio. It can combine GBP insights, GA4 data, call-tracking results, and CRM metrics into one dashboard.
At a glance, you’ll see how all locations perform side by side. Then, drill into individual cities or stores to find what’s working and what needs attention.
Optimize Based on Insights
Once you have consistent tracking, insights start to stand out.
Spot underperforming branches early and dig into the “why.”
Maybe reviews are trending negative, citations are inaccurate, or local pages haven’t been updated in months.
At the same time, identify top-performing branches and replicate their wins across the rest of your network. Share these insights regularly with local managers so strategy and execution stay aligned.
Level Up Your Multi-Location SEO Game
Consistency is the quiet advantage in multi-location SEO.
Why?
Because brands that systemize how each branch builds trust, relevance, and citations win the long game in local search.
In short: The top performers don’t rely on guesswork. They build repeatable frameworks.
If you’re ready to scale smarter, explore our Local SEO Tools comparison.
You’ll find the platforms and features that make local SEO for multiple locations faster, easier, and far more effective — no matter how many branches you manage.
http://dubadosolutions.com/wp-content/uploads/2017/05/dubado-logo-1.png00http://dubadosolutions.com/wp-content/uploads/2017/05/dubado-logo-1.png2025-11-05 15:44:342025-11-05 15:44:34Multi-Location SEO: How to Scale Without the Chaos
More than half of searches in 2025 don’t lead anywhere. People get answers from ChatGPT, Perplexity, and Gemini without clicking a single link.
Not showing up in those responses? You’re invisible to half the internet.
That’s where answer engine optimization (AEO) comes in. It helps your brand become the answer that AI tools deliver.
This guide breaks down how AEO works, how it compares to SEO, and what steps you can take to make your content more findable across modern search platforms.
Key Takeaways
Around 60 percent of searches now end without a click. Answer engines like ChatGPT and Perplexity deliver results without sending users to your site.
Answer engine optimization helps your content show up in AI-generated responses and voice search results.
AEO extends your SEO strategy by focusing on visibility in conversational and zero-click search environments.
To win in AEO, you need to optimize for direct questions, structured answers, user intent, and authority signals.
AI-first search is already shifting user behavior. The earlier you adapt, the more visibility you’ll protect.
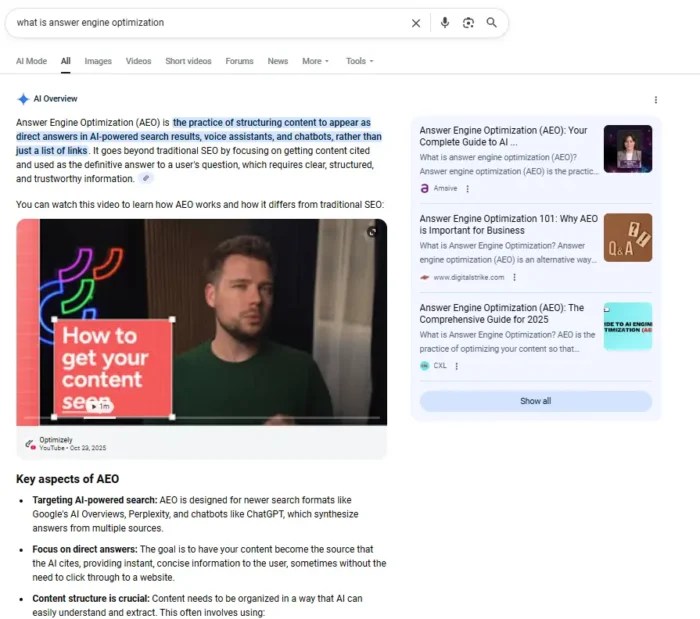
What is Answer Engine Optimization?
Answer engine optimization (AEO) makes your content easy for AI tools to find and use as a direct answer.
This started with rich results in Google like Featured Snippets and People Also Ask, but today, AEO is about showing up in a full ecosystem of AI-driven answer engines like ChatGPT, Perplexity, Gemini, and Google’s AI Overviews.
While there are technically still links as a part of these tools, there’s no guarantee a user will click on them.
Your content needs to match how large language models (LLMs) process information if you want to appear in those answers. This includes:
Natural language clarity
Structured data and schema markup
Topical authority and entity-level signals
Inclusion in knowledge graphs and trusted datasets
These systems rely on machine learning and natural language processing to determine what content best fits the user’s query. If your site structure and content format aren’t optimized for this, you are less likely to be cited.
AEO isn’t some future tactic. It’s how visibility works now.
Why is AEO Important?
Search has changed. It’s not just about blue links on a results page anymore. Tools like ChatGPT, Perplexity, and Google’s AI Overviews are changing how people access information and how brands show up.
The rise of these answer engines has led to a sharp increase in zero‑click searches. In many cases, users now get what they need without ever visiting a website. That means if your content isn’t optimized for those responses, you’re missing visibility.
Voice assistants like Alexa, Siri, and Google Assistant work the same way. As generative AI improves by summarizing the web, fewer sources get shown per query, putting more pressure on marketers to be the one selected.
People expect answers fast. They won’t scroll through ten links when one will do. AEO is about aligning your content to that expectation: clear answers, fast.
And the impact isn’t just on organic traffic. AEO boosts brand visibility, strengthens trust signals, and improves discoverability across AI tools and platforms. If you’re investing in SEO but ignoring answer engine optimization, you’re missing opportunities.
How is AEO Different Than SEO?
AEO and SEO work toward the same outcome (getting your content discovered) but the paths they take are different.
Search engine optimization (SEO)focuses on improving rankings within search engine results pages. That includes optimizing technical elements, matching content to user intent, building links, and improving site structure. It’s about increasing visibility across a range of possible results.
Answer engine optimization (AEO) focuses on earning the single, summarized response delivered by an AI system. These systems rely more heavily on structured answers, clarity, and content that fits within specific answer formats. You’re competing for the only spot that gets shown, not position ten.
AEO is often confused with Generative Engine Optimization (GEO), which is related but distinct. GEO focuses on creating content that gets cited by AI tools as a source. AEO focuses on optimizing existing content to be surfaced directly within the answer. Both matter, but they solve different problems.
What Are AI Hallucinations And How Can You Avoid Them?
AI hallucinations happen when tools like ChatGPT give answers that sound right but are completely wrong. This happens when AI pulls outdated, misattributed, or low-quality information when summarizing information.
In one example, users asked a chatbot for medical advice and received fabricated product suggestions. Other tools have invented studies, misquoted statistics, or pulled misleading content from forums.
The risk increases when a brand has little online authority or inconsistent information across platforms. If the AI can’t verify what’s real, it fills in the blanks and gets it wrong.
To reduce your risk of hallucinated results about your business:
Keep your website and public profiles updated with accurate, consistent information
Use schema markup and structured data to help AI interpret your content correctly
Publish expert-led, well-cited content on topics you want to rank for
Monitor where and how your brand is mentioned across platforms
Protecting your brand from hallucinations goes beyond technical fixes. It’s part of owning your visibility.
Strategies For Appearing In Answer Engines
Keywords alone won’t get you featured in AI responses. You need clear, credible, well-structured content that’s easy for machines to understand.
The strategies below are designed to help your site show up in AI summaries, voice results, and other answer-first formats.
Look at Your Existing Answer Engine Visibility
Before you start new optimizations, start by reviewing what’s already working. You may already have content showing up in AI searches like Perplexity, ChatGPT with browsing, or AI Overviews in Google.
Platforms like Ubersuggest Profound track brand and URL visibility across AI answers. These tools show what questions your site already ranks for, what sources AI is pulling from, and where gaps exist.
You can also run manual prompts in ChatGPT or Perplexity using branded and non-branded queries. Try asking questions you’d want your content to answer, and take note of what shows up.
This audit shows you where you stand and helps you prioritize. If certain pages are already being pulled into AI results, you may just need small tweaks. If others aren’t surfacing at all, you’ll know where to focus first.
Understand User Intent
Search engines, chatbots, and voice assistants all aim to solve one thing: what the user actually wants to know. That’s where search intent comes in, and it’s a foundational piece of answer engine optimization.
AI tools don’t just crawl your content. They interpret it. If your page doesn’t match the kind of answer a user is looking for, it likely won’t get picked.
Intent typically falls into four categories: informational, transactional, navigational, or commercial. But when it comes to AEO, you also need to understand how people phrase questions. “What is,” “how to,” “best tools for,” and “should I” are all common patterns.
So how can you learn the intent behind the keywords you’re targeting or ranking for? Keyword research tools, like Ubersuggest and Semrush can help.
Once you understand what search terms your website ranks for, you can dig into the most popular terms. Using Ubersuggest’s Keyword Overview tool, for example, lets you see search volume and SEO difficulty.
The keywords in the above screenshot are largely informational. The searcher is hoping to learn more about digital marketing. As we continue to scroll through the list of queries , we begin to see more commercial and transactional results.
Take “digital marketing platforms” as an example:
There’s certainly some informational intent behind the question, but it’s also possible to be commercial intent. For example, a business who is looking to subscribe to a platform may want to learn more about it so they can make the right decision.
If you’re a digital marketing agency with a platform, and you understand the intent behind that keyword, you can create content that captures the customer within the purchase journey.
Content that targets the transactional intent of this keyword may be a digital marketing platform or tool roundup. You can position your platform as the best option, or even create a post with affiliate links to other relevant platforms.
Intent matters as much as the question itself. This is why you must consider the whole picture when incorporating such keywords into your content.
Use The Direct Question/Answer Format When Applicable
If your content doesn’t look like an answer, AI tools won’t treat it like one. That’s why formatting matters more than ever in answer engine optimization.
Start by identifying the questions your audience is asking. Then give them a direct response near the top of your content, ideally within the first few sentences or paragraphs.
Use clear H2 or H3 headings for common queries. Add a dedicated FAQ section if your topic has multiple related questions. Bullet points, concise summaries, and short paragraphs all help AI models parse your content more accurately.
You’re not just helping users skim. You’re helping machines understand what your content is trying to say and where it fits.
Google’s AI Overviews, People Also Ask, and tools like Perplexity and Gemini all pull from content that’s been structured clearly and answers a defined question.
This is one of the simplest changes you can make to support AEO, and it pays off fast.
Set Up and Update Business Profiles Whenever Possible
Answer engines don’t just scan your website. They also pull from structured data across the web. That includes business directories, local listings, and public profiles.
Tools like ChatGPT and Perplexity can surface business info from places like Google Business Profile, Yelp, Apple Maps, and Bing. If your data is missing or inconsistent, your brand may be excluded from results.
Make sure your listings include accurate details like name, address, phone number (NAP), hours, and website. Add photos, reviews, and categories where possible. These signals all feed into the authority and relevance AI models look for.
Don’t treat this as a one-time setup. Keep listings up to date, especially if your business has multiple locations or seasonal changes.
The goal is to make it easy for AI systems to confirm your legitimacy and context. You’re giving them structured proof of who you are and what you offer.
Become an Authority In Your Industry
AI systems scan for more than keywords. They look for trusted voices. If your brand is consistently cited, reviewed, and linked to across the web, you’re more likely to be featured in AI-generated responses. When we surveyed a group of marketing professionals who said that optimizing their content to appear in chatbot responses has been a major priority for them, 34 percent had the top goal of building brand awareness and loyalty.
That trust is built through authority. This includes third-party mentions, earned backlinks, expert-led content, and consistent appearances in respected directories or roundups.
Authoritative brands are also more likely to be surfaced in zero-click search, local packs, and answer engine results. Why? Because these platforms want to deliver credible information. If your site has proven expertise on a topic, it’s more likely to be chosen.
To build that authority, focus on publishing effective content, earning brand mentions in your niche, and contributing insights on third-party platforms. Guest posts, research, and interviews can all help grow your presence.
This takes time, but it compounds. The stronger a thought leader you are seen as, the harder it is for AI tools to ignore your content.
Incorporate AI Into Your Content Marketing Strategy
AI is changing how people search and how we create content. Used correctly, it can help you build pages that are more likely to surface in answer engines.
Start by using tools like ChatGPT to test your topic coverage. Ask sample questions your audience might type into an AI search. What comes up? If your site isn’t mentioned, or the answers are thin, you’ve found a gap to fill.
Many marketers are already leaning into this. In a survey we ran, over 81 percent of professionals optimizing for AI responses said they had been incorporating AI into their business processes for six months or more.
The top use cases included improving efficiency, sparking innovation, and enhancing customer experience. But AEO-focused content creation is where AI can deliver quick wins.
You can use AI to generate question-based outlines, draft summaries, or test how clearly your answers come across. Just don’t skip the human layer. Tools can help you move faster, but high-quality content still requires expertise.
Implement Schema Markup
Schema markup helps AI tools understand your content better. That can make the difference between being ignored or included in an answer.
Schema is a form of structured data that tells search engines and AI systems what your page is about. It adds a layer of clarity in the background without changing how your content looks to users.
For example, if you have a FAQ section, adding FAQ schema helps Google and answer engines extract that content more confidently. The same goes for how-to schema, product schema, article schema, and organization schema.
The more structured your content is, the easier it is for AI to match it to the right query. Schema also increases your chances of appearing in AI Overviews, People Also Ask, and AI-generated summaries.
You don’t need to add schema manually. Most SEO plugins, like Yoast or Rank Math, include built-in schema tools. There are also free generators available online if you want to apply it page by page.
Think of schema as a translator between your content and the AI tools deciding what gets shown. The clearer your signals, the better your visibility.
Review and Monitor Your AEO Progress
Answer engine optimization isn’t a one-time fix. Once you implement AEO strategies, you need a plan for tracking performance and making improvements.
Set a regular schedule to check whether your content is being picked up by AI tools. Look for patterns in which pages get cited, what queries they appear for, and where your visibility drops off.
This doesn’t require complex reporting. You can track progress using a simple spreadsheet, noting the presence or absence of your brand in AI summaries across key queries.
When something stops appearing, that’s your signal to re-optimize. Refresh the content, clarify the structure, or align it more closely with search intent. If something continues to perform well, look at what’s working and replicate that approach elsewhere.
AEO is still evolving, which makes monitoring even more important. The brands that adapt fastest will stay visible the longest.
What Factors Matter Most for ChatGPT Recommendations?
We ran a study to understand why ChatGPT recommends certain brands in its responses. After testing over 80 possible factors, six rose to the top.
Brand mentions: The more your brand is cited across the web, the higher the likelihood ChatGPT will surface it.
Reviews: Quality and volume of customer reviews, especially on third-party sites, play a major role.
Relevancy: If your site’s keywords match the user’s query, and the page offers helpful context, you’re more likely to get picked.
Age: Older, more established brands tend to be trusted more often by AI models.
Recommendations: Listicles and curated “best of” roundups (even those using affiliate links) still influence ChatGPT outputs.
Authority: High-authority domains with credible backlinks and consistent content earn more inclusion in AI answers.
You can’t control every factor, but you can influence most of them by building strong, reliable content that other sites and users want to reference.
FAQs
What is answer engine optimization (AEO)?
Answer engine optimization is the process of improving your content so it appears in AI-generated answers. It focuses on clarity, structure, authority, and accuracy—so tools like ChatGPT, Perplexity, and Google’s AI Overviews can pull your content as a trusted response. It builds on traditional SEO but adapts it for zero-click and conversational search experiences.
How do I do AEO?
Start by identifying the types of questions your audience is asking. Then create clear, concise answers—formatted with proper headers, schema markup, and supporting data. Use tools to track which content appears in AI results, and optimize based on visibility gaps.
Focus on building authority and publishing quality content that answer engines can trust.
What are the key differences between AEO and traditional SEO?
AEO is about getting your content pulled into AI-generated responses. SEO is about ranking in search engine results pages. Both use similar tactics, but AEO requires more structured, answer-ready content.
Conclusion
AI is already reshaping how people search, and answer engines are gaining traction fast. If your content isn’t built for these platforms, you’re likely losing visibility—even if you’re ranking well in traditional search.
The good news: if you’ve been investing in SEO, many of the foundations are already in place. AEO simply takes it further, focusing on clarity, structure, and intent.
Tools like Ubersuggest can help you find question-based keywords, track content performance, and identify optimization gaps. From there, it’s about building better answers—and making sure they’re easy for AI to find.
Now is the time to get proactive. The longer you wait to adapt, the harder it’ll be to catch up.
http://dubadosolutions.com/wp-content/uploads/2017/05/dubado-logo-1.png00http://dubadosolutions.com/wp-content/uploads/2017/05/dubado-logo-1.png2025-11-03 20:00:002025-11-03 20:00:00AEO (Answer Engine Optimization): How to Get AI Generator to Mention my Business
Search is changing faster than ever – and 2026 may be the year it fully breaks from the past.
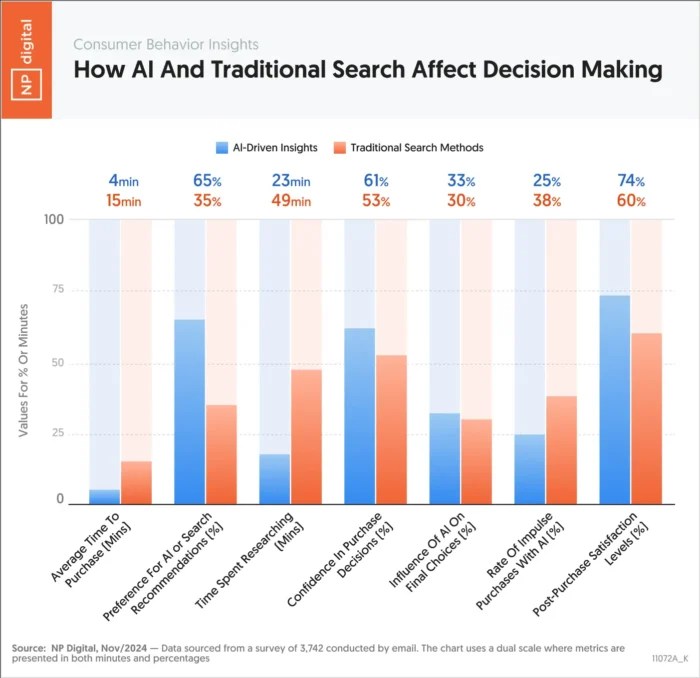
Over the last year, AI has reshaped how people discover, decide, and convert, collapsing the traditional customer journey and cutting touchpoints in half.
AI-powered assistants and large language models (LLMs) will handle roughly 25% of global search queries by 2026, per Gatner, replacing many traditional search interactions.
We’re already seeing the effects. Traffic from LLMs is climbing at a hockey-stick pace, signaling a massive shift in how users find information.
To stay competitive, marketers need to build strong content and experience flywheels, as answer engine optimization (AEO) and generative engine optimization (GEO) become critical priorities.
Bruce Clay, founder and president of Bruce Clay Inc., predicted:
“AI-powered search is expected to cause traffic to continue to drop for many sites, creating a disturbance in the force.”
Adopting AI isn’t optional – it’s foundational.
Yet most marketing systems weren’t designed to operate in an AI-first world.
Disconnected tools and data silos make orchestration difficult and create inconsistencies that derail performance.
To succeed in 2026, brands will need integrated, cross-functional, omnichannel systems that connect data, content, and customer experience.
Building a resilient digital presence for 2026
Preparing a brand’s digital presence for an AI-driven world means rethinking data, tools, and customer experiences while presenting a clear, consistent brand story.
The goal is to deliver personalized content and be ready for agentic experiences, where AI assistants act on behalf of users.
This shift begins with the evolution of search itself.
The biggest change is moving away from a simple query-and-response model to a more dynamic, reasoning-driven conversation.
Traditional search was like a game of chess – discrete and predictable. AI search, on the other hand, is more like a jazz concert – continuous and fluid.
The experience has shifted from browsing lists and visiting websites to receiving direct, synthesized answers.
Instead of matching keywords to an index, AI uses query fan-out, which involves:
Breaking queries into components.
Analyzing multiple sources.
Delivering a single, comprehensive answer based on consistent patterns.
With AI, the traditional marketing funnel is shrinking. AI search can move directly from intent to conversion in minutes, dramatically accelerating the process.
We’re already seeing three- to eight-times higher conversion rates from traffic originating in AI search.
According to Crystal Carter, head of AI search and SEO communications at Wix:
“Traffic from LLMs (like ChatGPT and Perplexity) is becoming increasingly distinct from Google search traffic, requiring separate optimization and analysis strategies.”
New types of intents, like “generative” (e.g., “create an image”) and “no intent” (e.g., “thanks”), now make up almost half of all LLM interactions and don’t require a website visit.
Search is becoming action-oriented.
As AI systems start booking tables, making appointments, and completing purchases, even transactional journeys may no longer end on your website.
Search ‘everywhere’ optimization: The new SEO
For brands, the goal is no longer to be a single destination. It’s to be present wherever your audience is.
That means becoming a trusted data source that powers the new, agentic ecosystem.
AI systems prioritize clarity, consistency, and patterns, so channel silos must give way to a well-integrated, omnichannel approach.
Ideally, AI agents should be able to access all your brand data and deliver complete, contextually accurate results based on user intent.
As Bill Hunt, president of Back Azimuth Consulting, explained:
“AI agents like ChatGPT will shift from answering questions to completing transactions. Both the Shopify connectors and feeds, as well as Walmart and Amazon saying they are Google killers. Being ‘callable’ through APIs and integrations will be as critical in 2026 as being crawlable was in 2010.”
In this new paradigm, websites are evolving from sales destinations to data and information repositories – built not just for human visitors, but for AI systems that retrieve, interpret, and act on that data.
7 key focus areas shaping marketing and search in 2026
To compete in 2026 and beyond, brands must optimize for visibility across every relevant platform.
Here are seven key priorities and emerging trends shaping the future of search and martech.
1. Strengthen technical SEO foundations for AI retrievability
The foundation of search is shifting from traditional crawlability to GEO.
The core principle of GEO is retrievability – ensuring that high-quality content is not only discoverable but also easily accessible and understood by AI models.
To prepare for this shift, your website should serve as a centralized data hub for your content and digital assets, enhancing the experience for both humans and AI systems.
Make sure to grant access to AI crawlers in your robots.txt file, use server-side rendering (SSR) for core content, and adopt progressive indexing protocols like IndexNow, used by Bing.
2. Build localized visibility in AI-driven environments
Local SEO has evolved – from data accuracy in its 1.0 phase, to profile completeness and engagement in 2.0, to personalized experiences in what’s now emerging as Local 3.0.
AI models, particularly Google’s AI Mode, increasingly cite local business information from sources like Google Maps and online directories.
That makes core local SEO practices – NAP consistency and Google Business Profile optimization – critical for maintaining AI visibility.
Pages with robust schema markup also tend to earn higher citation rates in AI Overviews, reinforcing the importance of structured data for local relevance.
The biggest challenge today isn’t just creating content – it’s creating a connected experience.
As companies integrate AI into their digital experience platforms (DXPs), the focus must shift from producing siloed assets to building a connected content flywheel.
That begins with a deep understanding of who your customers are and what they need, allowing you to fill content gaps in real time and stay present at every critical touchpoint.
DXPs are no longer static repositories. They’re evolving into intelligent, AI-native engines that proactively shape user experiences.
The ideal platform uses AI to create quality content at scale, powering a flywheel that delivers personalized, efficient, and well-governed customer journeys.
This is especially important for large brands and multilocation businesses, where updating hundreds of pages still requires manual, repetitive effort.
Here are the key steps to creating quality content and building a content flywheel.
Insights: Identify customer intent and content gaps
Your content strategy should be guided by real-time customer needs.
Use AI-powered tools to uncover the questions and challenges your audience is trying to solve.
Then analyze your existing content to identify gaps where your brand isn’t providing the right answers.
Creation: Develop deep, AI-structured content
To create content that performs well in AI search, start by assessing AI visibility and user sentiment.
Use AI to scale the development of deep, comprehensive content – always with a human in the loop.
Since AI engines draw from text, images, videos, and charts, your content must be equally diverse.
Just as important, it must be machine-readable so AI systems can synthesize and reason with it.
Prioritize an entity-based SEO strategy to build topical authority, and use comprehensive schema markup to help search engines understand your brand and content context.
Clearly structuring your data also prepares your site for advanced conversational search.
It ensures visibility in the next generation of AI-powered answer engines and readiness for NLWeb, the open protocol spearheaded by Microsoft to make websites conversational.
Establish a human-in-the-loop workflow to review, update, and refresh content regularly, keeping it accurate, relevant, and effective in answering user queries.
Publish from a centralized source to maintain consistency across owned channels, and adopt rapid indexing protocols like IndexNow to accelerate discovery and visibility.
Monitor and iterate
Continuously track visibility and performance within AI models by testing target prompts.
Deploy an agile strategy – as you distribute content, monitor results, experiment with new approaches, and refine continuously, the flywheel becomes self-sustaining.
Each cycle feeds fresh insights back into the system, helping your content strategy stay adaptable and build momentum over time.
“AI search engines synthesize across ecosystems, not just pages. Marketing leaders must ensure their digital footprint works as a unified system, not isolated campaigns,” Hunt said.
Businesses must maintain consistent, clear information across every channel.
Traditional SEO is giving way to relevance engineering – a discipline centered on systematically creating and structuring content for semantic relevance.
This approach helps brands navigate today’s increasingly complex query landscape.
4. Create a consistent, data-driven experience flywheel
While the content flywheel attracts visitors, the experience flywheel converts them – a critical function in an era of zero-click searches. It operates on a continuous feedback loop.
Strategy: Building an experience strategy starts with unified data from every customer touchpoint and channel. AI can segment this data to reveal audience expectations and friction points, helping shape a strategy grounded in real behavior.
Experience: AI can then put this data to work – connecting audience intent, personas, desired outcomes, and business goals to generate predictive insights that drive personalized and agentic experiences dynamically.
Conversion: AI also helps track the customer journey through the funnel across channels and touchpoints. Dynamic A/B testing and conversion rate optimization (CRO) can then be done at scale, tailored to audience segments and intent.
Iteration: The goal isn’t perfection but agility. Monitoring performance alone isn’t enough – iteration matters. Use data to make real-time pivots, refining your strategy with every new learning.
The experience flywheel becomes a self-reinforcing engine that continuously drives engagement, builds loyalty, and accelerates growth.
5. Use AI agents to orchestrate journeys and workflows
As AI-driven search becomes increasingly agentic, it establishes a new standard for the seamless digital experiences customers expect.
To meet this demand, brands must use journey orchestration and workflow automation powered by AI agents that guide users through connected, intuitive experiences.
The key is to deploy specialized vertical AI agents trained on your business data.
By orchestrating these agents across the customer journey, you can deliver hyper-personalized, omnichannel experiences.
This is only possible if your website and systems are ready to interact with AI agents.
For internal teams, AI agents also offer major opportunities to automate manual workflows across the entire marketing landscape.
6. Redefine KPIs for an AI-first performance model
As AI satisfies user intent more directly within search results, traditional metrics like rankings and traffic are losing relevance.
This shift means citation is the new rank, pushing teams to optimize content for retrievability rather than rankability.
As metrics like click-through rate decline in importance, new success indicators are emerging – including LLM visibility score, AI citation count, share of voice, and sentiment.
Success now depends on query diversity, or the ability to answer multiple related long-tail queries effectively.
“Traditional metrics like impressions, clicks, and click-through rates are becoming much more difficult to rely on as KPIs. They are still useful to look at, but marketers should renew their focus on human behavior. Share of Voice is one of the best KPIs to measure this new behavior. Companies that ignore visibility in AI-driven responses risk ‘feeding that territory’ to their competitors.”
7. Integrate systems and data to power a unified marketing infrastructure
A fragmented marketing tech stack with siloed tools creates inefficiencies and hidden costs.
Data fragmentation and manual processes increase operational expenses and derail integration efforts.
Shifting focus to an integrated marketing platform – and evaluating total cost of ownership – helps overcome these challenges.
An integrated solution provides the consistency, clarity, and unified data needed to keep your digital presence adaptive and competitive.
As we move into 2026, AI is not just another tool – it’s rebuilding the customer journey from the ground up.
With AI assistants expected to handle a quarter of all search queries, the traditional marketing funnel is shrinking.
The new landscape is defined by agentic, action-oriented interactions that can bypass websites entirely, demanding a fundamental strategic shift from every brand.
To stay visible and relevant, businesses must evolve from being destinations to being trusted data sources for AI.
That begins by fueling a content flywheel with deep, structured content accessible across every channel.
Once this flywheel attracts an audience, an experience flywheel – powered by unified customer data and an integrated, AI-native platform – takes over to drive conversion through deep personalization.
Ultimately, the brands that succeed will be those that embrace this new ecosystem.
They’ll replace outdated metrics, such as traffic, with new KPIs focused on AI visibility, tear down silos through integration, and prioritize delivering seamless, omnichannel experiences.
Thank you to Bill Hunt, Ray Grieselhuber, Bruce Clay, Crystal Carter, David Banahan, and Tushar Prabhu for their insights and contributions.
https://i0.wp.com/dubadosolutions.com/wp-content/uploads/2025/11/customer-journey-evolution-Ks4T8Y.jpg?fit=1850%2C550&ssl=15501850http://dubadosolutions.com/wp-content/uploads/2017/05/dubado-logo-1.png2025-11-03 15:00:002025-11-03 15:00:007 focus areas as AI transforms search and the customer journey in 2026
Google gives local businesses two main ways to generate PPC leads online: Local Services Ads (LSAs) and Search campaigns.
LSAs are pay-per-lead campaigns – for actions such as calls, messages, or booked appointments – with a quick setup process that involves verifying your business. After that, Google automates most of the ad and keyword setup.
Search campaigns are more complex but offer far greater control over ad copy, keywords, and optimization.
Understanding how each format works – and when to use them – can help you get more qualified leads and make smarter use of your ad budget.
Most advertisers use both and shift budgets based on which delivers better long-term results.
Getting started with Google Local Services Ads
LSAs work for businesses of all sizes, not just those with small budgets.
For small business owners, LSAs offer an easy way to set up and run ads quickly.
This is one of the few ad formats where following Google’s setup instructions can actually work well.
That’s not the case for Google Search campaigns, which are far more complex and often waste spend when relying on Google’s automated suggestions.
Small businesses can prepay a few hundred dollars to test results.
While LSAs offer fewer options for control, customization, or optimization, they can work well for very small budgets.
They don’t require as much active management as Search campaigns – though they aren’t completely “set it and forget it” either.
Larger companies can also benefit from testing LSAs alongside other ad formats to compare results.
However, not all industries are eligible, so always confirm availability before allocating budget.
During setup, review all details carefully – including company information, service areas, and specific services – rather than assuming Google configured them correctly.
You have limited control over ad copy and keywords, since Google automatically determines relevant terms.
As Google’s documentation notes, “there is no need to do keyword research as relevant keywords are automatically determined by Google.”
This can work in your favor – or lead to irrelevant traffic – because you can’t define your own keywords.
Reviews are especially important in this format, as they appear prominently and heavily influence results. Collecting legitimate, high-quality reviews is critical for success.
To evaluate performance, connect third-party tools to track and qualify leads.
A basic CRM can help you measure how many leads convert into customers.
Platforms like HouseCall Pro and ServiceTitan can also integrate booking features, letting customers schedule appointments directly through your LSAs.
Google Search campaigns are more complex but offer a wider range of features for setup and optimization.
On top of setting business hours, target areas, and other details, Search campaigns give you greater control over ad testing, assets, keywords, match types, bidding strategies, and more.
Testing with just a few hundred dollars is not recommended. These campaigns require active monitoring and frequent optimization to perform well over time.
Unlike LSAs, you can add negative keywords and test a wide range of terms to identify which are most effective and profitable.
A/B testing ad copy and landing pages is also possible, giving Search campaigns much more scalability.
When starting, test a small budget using phrase and exact match keywords only, even with manual CPC bidding to set your maximum bid per click.
This offers tight control for new accounts, though it’s typically a temporary setup before switching to automated bidding and broader match types.
Begin with broad match keywords using a Maximize Conversions bid strategy, then add a target CPA (tCPA) once performance data builds.
In industries with high CPCs, set up portfolio bidding to include both a tCPA and a maximum CPC bid.
Microsoft Ads includes this option natively in its tCPA setting, so portfolio bidding isn’t required there.
After running a Search campaign for two to three months, begin expanding and refining based on performance.
Add new campaigns and ad groups to test additional keyword and ad combinations, aligning each with specific landing pages to maximize lead generation – something not possible with LSAs.
Combining LSAs and Search campaigns for stronger results
As with any advertising channel, it’s essential to regularly evaluate lead quality using a CRM and call tracking tools, such as CallTrackingMetrics or CallRail.
When running both LSAs and Search ads, compare leads from each to assess performance.
LSAs often face lead quality issues, despite being pay-per-lead campaigns.
Google continues improving spam filtering and invalid lead detection for LSAs, but the system still isn’t perfect. Invalid leads can be disputed.
Ad positioning also differs between the two formats. LSAs typically appear at the top of the page, though fewer of them are shown compared to Search ads.
Showing in multiple placements isn’t a problem, but you should continually evaluate cost per lead, lead quality, and lead-to-customer conversion rates for both formats.
For larger budgets, several other Google Ads campaign types are worth testing. These can support lead generation directly or help build local brand awareness.
Display, Video and Demand Gen campaigns can generate leads on their own or build brand awareness for top-of-funnel audiences.
They work well for higher-priced products or services with longer sales cycles, and for lower-priced services that rely on staying top-of-mind – such as plumbing or AC repair.
Performance Max campaigns can also deliver strong lead volume.
However, because they extend beyond Search, it’s essential to monitor lead quality through your CRM and compare it against Search and LSA performance.
With Google Analytics and Google Ads tracking multiple touchpoints before a conversion, you may see fractional conversions.
For example, 0.5 for a Video campaign and 0.5 for a Search campaign – indicating that both contributed to a single lead.
While not a perfect system, this data provides useful context for how different campaigns interact across the customer journey.
Test and compare
Both small and large businesses can benefit from testing LSAs, and all should consider running them alongside Search campaigns to compare results.
There’s no one-size-fits-all approach – both formats can be profitable when properly tracked and optimized.
https://i0.wp.com/dubadosolutions.com/wp-content/uploads/2025/11/Google-Local-Services-Ads-vs.-Search-Ads-Which-drives-better-local-leads-7uLXRn.jpg?fit=1920%2C1080&ssl=110801920http://dubadosolutions.com/wp-content/uploads/2017/05/dubado-logo-1.png2025-11-03 14:00:002025-11-03 14:00:00Google Local Services Ads vs. Search Ads: Which drives better local leads?
The internet has become the go-to source for everything from trivia about celebrities to fixing our kitchen sinks. But the way people find that information? That’s changing fast.
Search engines don’t work the way they did five years ago. Machine learning now powers how Google understands queries, ranks content, and delivers results. The basic SEO strategies that used to work? They’re not enough anymore.
Miss this shift, and you miss traffic. Miss traffic, and you miss revenue.
Marketers who adapt to AI-powered search will dominate their niches. Those who don’t will watch their rankings drop.
Key Takeaways
AI SEO combines artificial intelligence with search engine optimization to improve keyword research, content creation, and technical optimization at scale.
Search engines like Google now use AI-powered algorithms (RankBrain, BERT, MUM) to understand user intent and deliver more relevant results.
AI tools can automate time-consuming SEO tasks like competitor analysis, content optimization, and technical audits, freeing your team to focus on strategy.
Zero-click searches and AI overviews mean you need to optimize not just for rankings, but for visibility in AI-generated summaries
Large language models (LLMs) like ChatGPT and Perplexity are becoming search alternatives, requiring a new approach to content that emphasizes expertise and proprietary insights.
What Is AI SEO and Why Is It Important?
AI SEO refers to using artificial intelligence to enhance SEO strategies (from keyword research to content optimization) while also optimizing your content for AI-powered search engines and platforms.
You need AI working for you in two ways: using AI tools to improve your SEO efficiency, and optimizing your content so AI systems recognize its value and surface it to users. Master both sides, and you’ll dominate your niche.
How AI Has Changed The World of SEO
AI has rewritten the SEO rulebook. Here are the biggest shifts marketers need to understand:
Zero-Click Searches Are Dominating
A growing percentage of searches now end without a click. Google’s AI Overviews, featured snippets, and knowledge panels answer questions directly in search results. This means you need to optimize for visibility in these AI-generated summaries, not just traditional blue-link rankings. Your content must be structured so it’s easily extracted and cited by AI.
LLM Platforms Are Becoming Search Alternatives
Large language models like ChatGPT, Perplexity, and Claude are handling search queries that would have gone to Google. These platforms synthesize information from multiple sources, which means your content needs to be authoritative enough to be selected and cited. Traditional click-through rates matter less; AI visibility is the new KPI.
Content Generation Has Scaled Exponentially
AI in marketing has made content creation faster and cheaper. Your competitors can now publish at volumes that were impossible five years ago. The bar for content quality has risen as a result. Generic information gets buried while deep expertise and proprietary insights stand out.
Google’s AI uses signals and patterns to distinguish genuine expertise from surface-level content. First-hand experience, original research, and unique perspectives now separate top-ranking content from everything else. (More on how to optimize for this later.)
AI SEO: Ways To Use AI To Improve Your Website
AI is changing how search engines work and transforming how marketers execute SEO strategies. Let’s look at the specific ways you can use AI tools and practices to boost your website’s performance and rankings.
Keyword Research With AI SEO
Keyword research used to be a manual slog. Now it’s a strategic advantage.
Modern platforms analyze SERPs at scale, identifying opportunities that would take humans weeks to uncover. Here’s what changes:
Hidden Opportunities at Scale
Scan thousands of keyword variations, search volumes, and competition levels in seconds. Long-tail keywords and topic clusters your competitors haven’t targeted? They surface automatically. Ubersuggest, for example, suggests related keywords based on semantic relationships, not just exact matches.
Intent Analysis Built In
Top-ranking content gets examined to determine whether searchers want information, products, or local services. No more guessing intent from a keyword, you see what types of content already rank.
Identify Link Building Targets
Backlink profiles across your industry get analyzed automatically. Sites that link to your competitors but not to you? Flagged. Broken links on authoritative sites where your content fits? Identified.
Trend Forecasting
Machine learning spots emerging search trends before they peak. Create content and build authority around topics as they gain traction, not after markets saturate.
The shift? Data analysis happens automatically. You focus on strategy and execution, choosing which opportunities align with your business goals.
Content Creation With AI SEO
AI has made content creation faster, but it hasn’t made quality optional. The most effective approach combines AI’s speed with human expertise and refinement.
Strategic Prompts Make the Difference
ChatGPT, Claude, and Jasper can generate outlines, first drafts, and variations. But generic prompts produce generic content. Your prompts need specifics: target keyword, desired tone, target audience, and the problem you’re solving. More context means better output.
Research and Ideation in Minutes
Top-performing content on any topic can be analyzed instantly. Common themes surface. Questions readers ask become visible. Gaps your content can fill get identified. Use this to generate multiple angles on a topic, then choose the most valuable approach for your audience.
The Human Element Separates Winners from Noise
Raw output lacks the expertise, personality, and unique insights that make content rank and convert. Your role:
Inject first-hand experience and proprietary data
Add specific examples from your work
Refine the tone to match your brand voice
Fact-check claims and add credible sources
Structure content for scannability
Draft the foundation in minutes. Spend your time on differentiation: original insights, case studies, expert analysis, and the depth that builds authority. This added input separates success from mediocrity.
As you can see in the graphic below, human-created content regularly outperforms AI-generated content in terms of traffic, and over extended periods, that gap only grows longer. Be sure to have some sort of human review/iteration to make the most of what AI can bring to the table.
Content Optimization With AI SEO
Optimization tools have evolved far beyond basic keyword checkers. They now analyze content quality, structure, and competitive positioning to deliver specific, actionable improvements.
Real-Time Optimization Suggestions
Your draft gets compared against top-ranking content instantly. Platforms like Surfer SEO, Clearscope, and Frase recommend keyword usage, content length, heading structure, and related topics to include. You see exactly how comprehensive your coverage needs to be.
Complex sentences? Flagged. Passive voice? Identified. Grammarly and Hemingway Editor suggest tone adjustments based on your target audience. Better readability keeps users on your page longer, a signal search engines track closely.
Semantic SEO and Topic Clusters
AI tools identify related concepts and subtopic clusters you should cover. This helps you build topic authority by creating comprehensive content that answers multiple related questions. Search engines favor sites that demonstrate depth of knowledge.
Use AI to identify gaps, verify you’re covering topics comprehensively, and polish your content to perform better in search results.
Scale Your SEO
The biggest advantage? Handling repetitive, time-consuming tasks at scale. Your team gets to focus on strategy and creative work that drives results.
Automated Technical Audits
Your entire site gets crawled automatically. Broken links, slow-loading pages, duplicate content, missing meta tags, all identified. Ahrefs and Semrush have audit features that can review your site and provide recommendations more easily.
Systematic Content Gap Analysis
Your content library compared against competitors reveals topics they cover that you don’t. Underperforming content that needs refreshing or consolidation surfaces automatically. You build comprehensive topic coverage systematically instead of guessing.
Reporting Without the Grunt Work
Analytics platforms track rankings, traffic, and conversions across hundreds of keywords. Trends get identified. Issues get flagged. Reports generate themselves. You spend less time pulling numbers and more time acting on insights.
Site-Wide Changes in Bulk
Need to update meta descriptions, image alt text, or internal links across your entire site? Some platforms handle the execution while you focus on strategy.
The outcome: manage SEO for larger sites with smaller teams, or handle more clients without burning out your staff.
Competitor Analysis
Competitor analysis reveals what’s working for your competition and where they’re vulnerable.
Modern platforms analyze competitor websites to show which keywords drive their organic traffic, what content topics perform best, their backlink profiles, technical SEO strengths and weaknesses, and content gaps you can exploit.
Semrush, Ahrefs, and SpyFu process massive amounts of data and identify patterns you’d never spot manually. Competitor pages ranking for multiple keywords? Visible. Content formats that work in your niche? Clear. Sites that link to competitors but not to you? Identified.
Make informed decisions: which topics to prioritize, what content formats to use, where to focus link-building efforts. Learn from what already works instead of guessing.
How To Optimize For AI SEO
Optimizing for AI-powered search engines and LLMs requires a different approach than traditional SEO. Here’s what you need to focus on:
Structure Content for AI Extraction
AI systems look for clear, well-organized information they can extract and cite. Use descriptive headings, concise paragraphs, and clear answers to common questions. Featured snippet-style formatting (definitions, lists, key takeaways, step-by-step instructions) makes your content easy for AI to parse and present.
Double Down on E-E-A-T
As mentioned earlier, Experience, Expertise, Authoritativeness, and Trustworthiness now separate content that ranks from content that doesn’t. Include author credentials. Cite original sources. Demonstrate first-hand experience. Generic information AI could generate itself won’t cut it. Unique insights and proprietary data will.
Use Schema Markup
Structured data helps AI understand your content context. Implement schema for articles, FAQs, how-tos, and reviews. This increases the likelihood of your content being featured in AI-generated summaries.
Optimize for Conversational Queries
LLMs respond to natural language questions. Create content that answers specific questions clearly. Think about how people phrase questions to voice assistants or chatbots, not just how they type into search boxes.
Build Topical Authority
Create comprehensive content clusters around core topics. AI systems favor sites that demonstrate depth of knowledge. Cover a topic from multiple angles rather than creating isolated articles.
AI and Search Everywhere Optimization
Search is no longer confined to Google. Users now find information across ChatGPT, Perplexity, social media platforms, and voice assistants. This is where Search Everywhere Optimization comes in.
AI has accelerated the fragmentation of search. Different platforms use different algorithms, but they all rely on AI to understand and rank content. Search Everywhere Optimization means:
Creating content optimized for multiple platforms, not just Google
Understanding how different AI systems evaluate and cite content
Building brand presence across the entire discovery ecosystem
Optimizing for both traditional SEO and LLM visibility
Marketers who focus solely on Google risk missing audiences who search elsewhere. AI makes it possible to optimize for multiple platforms simultaneously. However, it requires a broader strategic view of where your audience searches and how different AI systems work.
The future of SEO is about being discoverable everywhere your audience looks for information, not just ranking on Google.
FAQs
How to use AI for SEO?
Use AI tools for keyword research to identify opportunities at scale. Generate content outlines and first drafts, then add human expertise and refinement. Automate technical audits to find and fix site issues. Analyze competitor strategies to inform your approach. Use AI for content optimization suggestions, but always verify recommendations align with your goals and audience needs.
Will AI replace SEO?
No. AI is transforming how SEO works, but it won’t replace the discipline. Search engines still need quality content to rank, and users still need helpful information. AI handles repetitive tasks and data analysis, but human expertise, creativity, and strategic thinking remain essential. The most successful approach combines AI efficiency with human insight and experience.
What is AI SEO?
AI SEO refers to two practices: using artificial intelligence tools to improve your SEO efficiency (keyword research, content creation, technical audits), and optimizing your content so AI-powered search engines and platforms recognize its quality and surface it to users. Both aspects are critical for modern search visibility.
Conclusion
AI has fundamentally changed how search works, but it has also given marketers powerful new tools to compete and win.
The marketers who succeed won’t be the ones who resist AI or rely on it completely. They’ll be the ones who understand how to use AI strategically: automating repetitive tasks, generating insights at scale, and creating content that both AI systems and humans recognize as valuable.
Start by integrating AI tools into one aspect of your SEO workflow. Test what works. Refine your approach. Then expand to other areas.
Need help implementing these AI SEO strategies? I offer SEO consulting services to help businesses as the marketing world evolves.
http://dubadosolutions.com/wp-content/uploads/2017/05/dubado-logo-1.png00http://dubadosolutions.com/wp-content/uploads/2017/05/dubado-logo-1.png2025-11-02 20:00:002025-11-02 20:00:00How to Use AI SEO to Improve Your Website
There are over 1.3 million licensed attorneys in the United States. Tens of thousands of law firms are fighting for the same clients. The legal market is saturated, and potential clients start their search on Google or an AI platform like ChatGPT well before they pick up the phone.
If your firm isn’t visible in those searches, you don’t exist.
That’s where strategic law firm marketing makes the difference. This guide breaks down the digital strategies that actually work for legal practices. You’ll learn how to attract high-value clients, build trust in a skeptical market, and grow your practice without relying solely on referrals.
Key Takeaways
Legal marketing requires compliance with bar association ethics rules that don’t apply to other industries.
Digital strategies like SEO and content marketing generate qualified leads at a lower cost than traditional advertising.
Trust signals (reviews, credentials, case results) matter more in legal services than almost any other field.
Multi-channel campaigns combining organic visibility, paid ads, and reputation management deliver the best ROI.
Tracking performance metrics helps you invest in what works and cut what doesn’t.
Why Do Law Firms Need Marketing?
Running a law firm without marketing is like opening a practice in the desert and expecting clients to find you. They won’t.
Your potential clients are researching multiple firms before making contact. They’re reading reviews, comparing credentials, and looking for proof that you understand their specific problem. If you’re not actively managing your online presence, you’re losing cases to firms that are.
Marketing does three things for law firms:
First, it creates visibility. Your ideal clients need to know you exist before they can hire you.
Second, it builds authority. Publishing helpful content, earning positive reviews, and showcasing your expertise all signal that you’re credible and trustworthy.
Third, it drives qualified leads. Good marketing doesn’t just bring traffic. It brings people who actually need your services.
Word of mouth still matters, but it’s no longer enough. Potential clients want to verify that word of mouth online before they commit. Your digital presence is how they do that.
What Makes Law Firm Marketing Unique?
Legal marketing operates under constraints that don’t apply to most other industries:
Advertising Restrictions: Every state bar has rules about what lawyers can and cannot say in their marketing. Some prohibit guarantees about outcomes. Others restrict testimonials or case results. You need to know your jurisdiction’s rules before launching any campaign, or you risk disciplinary action.
High-Stakes Decision Making: Hiring a lawyer is personal. Clients are dealing with divorces, criminal charges, business disputes, or injuries. They’re stressed, skeptical, and risk-averse. They won’t hire you based on a flashy ad. They need proof that you understand their situation and can deliver results.
Longer Sales Cycle: Legal services aren’t impulse purchases. Potential clients might research for weeks or months before reaching out. Your marketing needs to stay in front of them during that entire window, building trust over time.
Practice Area Complexity: Marketing for personal injury law looks different than marketing for corporate law or family law. Each practice area attracts different clients with different concerns. A one-size-fits-all strategy doesn’t work.
These factors mean legal marketing has to be clear, ethical, and focused on building credibility. Aggressive tactics backfire. Shortcuts can get you penalized by Google or your state bar.
Digital Marketing Strategies For Law Firms
Digital marketing is where law firms win or lose new clients today. The strategies below consistently generate results for legal practices. Each section includes specific tactics you can implement, along with real examples of how firms are using them effectively.
SEO is the foundation of sustainable legal marketing. Unlike paid ads, organic search traffic is free once you’ve earned those rankings. The challenge is that legal SEO is competitive. You’re up against established firms with years of content and backlinks.
Here’s what works for legal SEO:
Optimize on-page elements for both users and search engines. Your title tags should include your primary keyword and location. Meta descriptions should summarize your value proposition and include a call to action. Header tags should structure your content logically, making it easy for both readers and search crawlers to understand the page hierarchy.
Create location-specific landing pages for every city or region you serve. A firm with offices in multiple cities needs dedicated pages for each location. Don’t just change the city name and duplicate the content. Each page should include location-specific information: local laws, nearby courts, testimonials from clients in that area, and details about your physical office.
Build high-quality backlinks from reputable sources. In legal SEO, links from other law firms, legal directories, local news sites, and educational institutions carry more weight than links from random blogs.
Fix technical SEO issues that hurt your rankings. Slow page load times, broken links, duplicate content, and poor mobile optimization all damage your ability to rank. Run regular technical audits using tools like Screaming Frog or Semrush to identify and fix these issues.
The screenshot below shows what winning local legal SEO looks like. The firm’s Google Business Profile appears in the map pack with reviews, photos, and complete business information. This placement is critical because the map pack appears above organic results for local searches.
Social Media For Law Firms
Social media content helps law firms stay top of mind, humanize their brand, and reach potential clients where they already spend time. While social platforms aren’t primary lead generation channels for most legal practices, they play an important supporting role in your overall marketing strategy.
The key to legal social media is providing value without crossing ethical boundaries. You can’t share confidential case information. You can’t make misleading claims about results. But you can educate, engage, and build relationships.
Here’s how law firms use social media effectively:
Focus on platforms where your target clients are active. For consumer-facing practices (family law, personal injury, criminal defense), Facebook and Instagram work well. For business-focused practices (corporate law, employment law), LinkedIn is more effective. YouTube works across the board because video content explains complex legal topics better than text.
Share educational content that addresses common questions and concerns. Post short explanations of legal concepts, updates on relevant laws, and tips for handling legal situations. A criminal defense firm might share “Your Rights During a Traffic Stop” or “What to Do If You’re Served with a Lawsuit.”.
Use video to make legal topics accessible. Short-form video performs exceptionally well on social platforms. Film yourself explaining a legal concept in 60 seconds. Show your office and introduce your team. Record client testimonials (with permission and following bar rules). Video humanizes your practice and makes you more relatable than competitors who only post text and stock photos.
Engage with your audience through comments and direct messages. Social media is a two-way channel. When someone comments on your post with a question, respond promptly and helpfully. When potential clients reach out via direct message, direct them to schedule a consultation. This responsiveness builds trust and can generate leads.
Law Firm Content Marketing
Content marketing helps law firms educate potential clients, demonstrate authority, and improve SEO.
Content marketing works for law firms because legal services are complicated. Potential clients don’t understand the process, the timeline, or what to expect. They’re searching for answers before they’re ready to hire anyone. If you provide those answers, you become the obvious choice when they’re ready to move forward
Here’s what effective legal content marketing looks like:
Create detailed blog posts and guides that address specific legal questions. Don’t write generic fluff. Write content that actually helps someone understand their situation. A family law firm might publish “What to Expect During Mediation in a Texas Divorce” or “How to Modify a Child Custody Agreement.” These are specific, actionable, and demonstrate expertise.
Build practice-area-specific landing pages that target local searches. A personal injury lawyer in Miami needs a page optimized for “Miami car accident lawyer” that explains Florida’s comparative negligence laws, statute of limitations, and what damages clients can recover.
The screenshot below shows exactly this approach in action. Notice the clear table of contents with headers focusing on different aspects of the probate process.
Develop lead magnets like checklists or downloadable guides. Offer something valuable in exchange for an email address. A criminal defense attorney might offer “10 Things to Do If You’re Arrested” as a downloadable PDF. This builds your email list and establishes authority.
Update old content regularly to keep it accurate and relevant. Laws change. Case precedents evolve. If your blog post from 2019 references outdated information, it hurts your credibility and your SEO. Review your top-performing content every six months (as a start) and refresh it as needed.
Paid Media for Law Firms
Paid search ads let law firms appear instantly at the top of Google for high-intent keywords. Unlike SEO, which takes months to build, PPC delivers immediate visibility. For competitive legal markets, paid media is often the fastest way to generate leads.
Legal keywords are expensive. Terms like “personal injury lawyer” or “DUI attorney” can cost $50 to $200 per click in major markets. That’s why your campaigns need to be highly targeted and conversion-optimized. You can’t afford to waste budget on broad, low-intent traffic.
Here’s how to make paid media work for legal services:
Use geo-targeted campaigns to focus on your actual service area. If you’re a divorce lawyer in Austin, don’t waste budget on clicks from Dallas or Houston. Set tight geographic boundaries around the areas where you can take cases. This reduces irrelevant traffic and improves your cost per lead.
Bid on high-intent keywords that signal immediate need. Someone searching “hire DUI lawyer tonight” or “emergency custody attorney” is ready to act now. These keywords cost more, but they convert at higher rates than informational searches like “what is a DUI.”
Set up call-only campaigns for mobile users. Over 60% of legal searches happen on mobile devices, and many users prefer to call immediately rather than fill out forms. Call-only ads display a phone number instead of a website link, making it easy for mobile searchers to connect with your firm right away. The example below demonstrates this perfectly. The firms use location extensions (address and map), call extensions (phone number), and sitelink extensions to maximize their ad’s real estate and provide multiple paths for potential clients to take action.
Track conversions beyond clicks. Use call tracking software to measure which keywords drive phone inquiries. Connect your PPC platform to your CRM so you can see which campaigns generate actual consultations and signed clients, not just website visits.
Law Firm LLM Marketing
AI-powered search is changing how people find legal help. Tools like ChatGPT and Google’s AI Overviews pull information directly from web content and display it without sending users to websites. For law firms, this means your content needs to be structured so AI can find it, understand it, and cite it.
LLM marketing means optimizing for these AI-driven search experiences. You’re not just trying to rank on page one anymore. You’re trying to become the source that AI tools reference when someone asks a legal question, whether it’s on or off Google.
Here’s what actually works:
Write content that directly answers common legal questions. Don’t bury the answer three paragraphs in. Start with a clear, concise response, then expand with details. AI tools favor content that gets to the point quickly.
Use schema markup to help AI understand your content structure. Schema tells search engines (and AI) what your content is about: whether it’s a how-to guide, a FAQ, a service page, or something else. This makes it easier for AI to pull the right information.
Focus on E-E-A-T (Experience, Expertise, Authority, Trustworthiness). Google’s search quality guidelines emphasize these factors, and AI tools are trained on similar principles. Showcase your credentials, cite your sources, and demonstrate real-world experience with the cases you discuss.
Target long-tail, question-based keywords. People ask AI tools questions the same way they’d ask a lawyer: “What happens if I get a DUI in California?” or “How long does a divorce take in Texas?” Create content that mirrors these natural queries.
Look at the example below. AI Overviews now surface legal information directly in search results by pulling from multiple authoritative sources. One way a personal injury firm could earn placement for a query like this is by publishing comprehensive guides that answer common accident questions with clear structure and proper schema markup.
Email Marketing For Law Firms
Email marketing is one of the most underutilized channels in legal marketing. Many firms assume people don’t want to hear from lawyers via email, but that’s not true. If you’re providing value, people will open your emails.
Email works because it keeps your firm top of mind during the long decision-making process that legal services require. Someone might visit your website, read a blog post, and then not be ready to hire you for another three months. Email lets you stay connected during that time.
Here’s how to build an effective email marketing strategy for your law firm:
Segment your email list by practice area and stage in the client journey. Don’t send the same email to everyone. A personal injury lead who downloaded your “Car Accident Checklist” needs different content than a business owner who attended your webinar on employment law. Segment your list so you can send relevant, targeted messages.
Create automated email sequences for lead nurturing. When someone downloads a lead magnet or fills out a contact form, trigger an automated sequence that provides additional value over the next few weeks. For example, a family law firm might send a series of emails covering “Preparing for Your First Divorce Consultation,” “Understanding Texas Community Property Laws,” and “What to Expect in Mediation.”
Share valuable content in your newsletters, not just promotional messages. The email example below gets this right. It includes a personal message from an attorney, links to recent blog posts, a featured case study, and upcoming events.
Always include a clear call to action. Every email should guide recipients toward a next step: schedule a consultation, download a resource, read a related blog post, or call your office. Make it easy for interested recipients to take action.
Law Firm Reputation Management
Your online reputation can make or break your ability to attract new clients. Studies show that 97% of consumers read online reviews before choosing a local business, and legal services are no exception. Potential clients research your firm’s reviews before reaching out.
Reputation management is about actively monitoring and influencing what people find when they search for your firm online. This isn’t necessarily about hiding negative feedback (which is impossible and often unethical), but building enough positive reviews and content that a few negative comments don’t dominate your online presence.
Here’s how law firms manage their reputation effectively:
Ask satisfied clients for reviews at the right time. The best time to request a review is right after a successful outcome, when clients are most grateful and engaged. Make the process easy by sending a direct link to your Google Business Profile or preferred review platform. Don’t offer incentives for positive reviews (this violates most platform policies).
Respond to all reviews, both positive and negative. Thank clients who leave positive reviews. For negative reviews, respond professionally and avoid getting defensive. Your response shows future clients how you handle criticism and difficult situations.
Monitor your firm’s online mentions across the web. Set up Google Alerts for your firm name and key attorneys. Check legal directories, social media, and review platforms regularly. If you find inaccurate information or fake reviews, report them to the platform. If you find negative but legitimate feedback, use it as an opportunity to improve your client experience.
Showcase testimonials and case results on your website, social media, and Google Business Profile (while following bar association rules). Look at the example below. This firm has over 500 reviews with a 4.8-star average, demonstrating consistent client satisfaction over time. The reviews are recent, which carries more weight with potential clients. The visible
Law Firm Website UX
Your website is often your first impression with potential clients. If it’s slow, confusing, or unprofessional, you’ve lost them before any real interaction happens. Good website UX (user experience) makes it easy for visitors to find information, trust your expertise, and contact you.
Law firm websites need to balance professionalism with accessibility. You want to appear credible and authoritative, but not intimidating or corporate. You want to showcase your expertise, but not overwhelm visitors with legal jargon.
Here’s what makes a law firm website effective:
Use clear, prominent calls to action. Every page should make it obvious how to contact you. “Schedule a Free Consultation” or “Call Now” buttons should be visible without scrolling. Include your phone number in the header of every page, especially for mobile users who want to call immediately.
Keep navigation simple and intuitive. Potential clients should be able to find practice area pages, attorney bios, and contact information within two clicks from the homepage. Avoid dropdown menus with too many options. Use clear labels that describe what visitors will find (not clever marketing language that confuses people).
Display trust signals above the fold. Show your credentials, years of experience, number of cases won, bar memberships, and awards in prominent locations. Potential clients need to see evidence of your expertise and track record before they’ll trust you with their case.
Optimize for mobile devices. Your website needs to load quickly, display correctly on small screens, and make it easy to call or fill out forms from a phone. Test your site on multiple devices to ensure the experience is smooth everywhere.
Measuring Your Law Firm Marketing Success
If you’re not tracking results, you’re guessing. Law firm marketing requires measurement to know what’s working and where to invest more resources.
Here are the key performance indicators every law firm should monitor:
Website traffic and traffic sources: Use Google Analytics to track how many people visit your site and where they come from (organic search, paid ads, social media, referrals). This tells you which channels drive the most visitors and helps you allocate budget effectively.
Keyword rankings: Monitor your positions for target keywords using tools like Semrush or Ubersuggest. Track both your overall visibility and specific rankings for high-value terms in your practice areas. Regular ranking reports show whether your SEO efforts are paying off.
Lead volume and quality: Count how many leads you generate each month through different channels (contact forms, phone calls, chat messages, consultation requests). But don’t just count quantity. Track lead quality by measuring how many leads turn into consultations and how many consultations become clients.
Cost per lead and cost per client: For paid campaigns, calculate how much you spend to acquire each lead and each new client. This ROI data helps you decide which campaigns to scale and which to pause. A channel that generates cheap leads but low conversion rates might be less valuable than one with higher costs but better-qualified prospects.
Review volume and ratings: Track your review count and average rating across platforms over time. Growing review volume signals that your reputation management efforts are working. Declining ratings indicate potential service issues that need attention.
Use tools like Google Looker Studio to build dashboards that centralize all this data. Having everything in one place makes it easier to spot trends, make decisions, and report results to partners or stakeholders.
FAQs
What is law firm marketing?
Law firm marketing refers to the strategies and tactics used to attract, engage, and convert clients for a legal practice. It includes SEO, content marketing, PPC, social media, and reputation management.
How do you market a law firm effectively?
Focus on your ideal client. Build trust through content, reviews, and clear communication. Invest in SEO and paid search to get in front of people actively looking for help. Track your results and adjust as needed.
How much does law firm marketing cost?
Costs vary based on location, competition, and strategy. Solo attorneys might spend $1,000/month, while larger firms can invest $10,000+ monthly. Start with what fits your goals and scale as you grow.
Conclusion
Effective law firm marketing separates the practices that grow from those that struggle. Visibility, credibility, and consistent lead generation don’t happen by accident. They require strategy, execution, and ongoing optimization.
Start with one or two channels where your ideal clients spend time. Build your foundation with SEO and a strong website. Add paid advertising for immediate results. Strengthen your reputation through reviews and client testimonials. Track everything so you know what’s driving results.
If you need help building a marketing strategy that brings in qualified clients, NP Digital’s consulting services can help you develop and execute a plan tailored to your practice.
http://dubadosolutions.com/wp-content/uploads/2017/05/dubado-logo-1.png00http://dubadosolutions.com/wp-content/uploads/2017/05/dubado-logo-1.png2025-10-31 19:00:002025-10-31 19:00:00 Law Firm Digital Marketing Strategies