Search is changing fast. This year, we’ve seen more instances of search engine results sharing space with AI-powered features that are changing how people find information.
Along with the changes to how search engines display information, we’re also seeing users explore new methods to search for information. Google AI Mode, Gemini, ChatGPT, Perplexity – there are many large language models (LLMs) capturing users’ attention, providing new ways for users online to discover and make decisions about your brand.
Customer sentiment, shown through reviews and ratings, is becoming a key part of both local and branded search.
For brands looking to stay ahead, focusing on sentiment, review ratings, and authority signals will be key. These are the items that not only affect rankings but also impact what shows up in search snippets and LLM responses.
LLMs like Google’s AI Mode are pulling together and highlighting customer sentiment within their responses when asked about specific brands or for geo-modified search queries, think “home repair near me”.
For businesses, paying attention to their review strategy and reputation will be key to standing apart in local results, overall organic visibility, and showing up favorably in AI responses. However, even with these changes, many of the tried-and-true best practices that have helped brands succeed in local search in the past still apply.
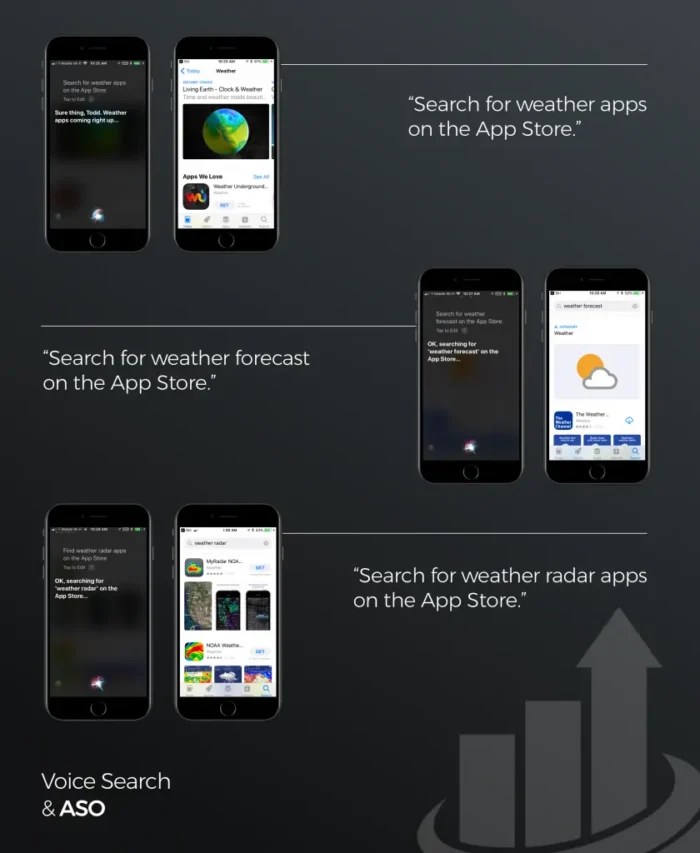
Searches with local intent: Google’s AI Mode
When it comes to local search, “near me” queries continue to be highly important. In traditional search, these typically trigger a Local Pack followed by organic blue links.
In Google’s AI Mode, the experience is similar. Users are shown a list of local businesses, often with short descriptions, star ratings, and review summaries.
The links cited are usually citation platforms like Yelp or TripAdvisor, business websites, or publications, and it’s common to find Google Business Profile place cards. Clicking these opens the familiar Google Business Profile interface, keeping users within the Google ecosystem.
What does this mean for businesses aiming to capture visibility in AI-driven local search results? Many of the foundations of local SEO still apply.
NAP consistency: Ensure your business name, address, and phone number (NAP) are accurate and consistent across all listings.
Citations: Maintain listings on trusted third-party sites like Yelp, TripAdvisor, and local directories to help reinforce credibility.
Google Business Profile optimization: Fully complete and regularly update your profile with accurate info, photos, business hours, and relevant categories.
Reviews: Generate and respond to reviews to build trust and signal relevance to both users and search engines.
Branded search results for local businesses
When searching for a local business using branded terms in AI Mode, it’s common to see many of the same elements and data sources as traditional search. These business overviews often include a description of the company, the products or services offered, and customer sentiment.
Often, the customer sentiment section summarizes review data pulled from multiple sources, such as TripAdvisor, Yelp, industry-specific sites such as Apartments.com, and Google Business Profile.
What’s unique about AI Mode is that it provides unbiased summaries of pros and cons about a business based directly on available customer reviews, which can come directly from Google Business Profile or be a mixed of review data from trusted online sources. These clear overviews include overall sentiment and often link to the business profiles.
AI Mode isn’t the first time Google has experimented with review summaries.
Some industries, like restaurants, already have “Review Summaries” in organic search results. These generative AI summaries highlight Google Business Profile review data, usually with a more positive tone, alongside the star rating and list of reviews.
The importance of reviews
Reviews shape how your brand appears online, whether they are displayed front and center on your Google Business Profile or surfaced as snippets in responses from LLMs. Google’s AI Mode, ChatGPT, and Perplexity all returned some information or mention of customer reviews when searching for local businesses, especially for branded queries.
These responses emphasize how both positive and negative offline experiences can influence what is said about your brand online and the importance of customer perception, especially when those experiences get highlighted for customers who may be discovering your brand for the first time.
Businesses need to pay attention to reviews, if not across all platforms, then at least on Google Business Profile. Review data is being pulled into AI-driven results and also plays a role in local search visibility.
“Prominence means how well-known a business is. Prominent places are more likely to show up in search results. This factor’s also based on info like how many websites link to your business and how many reviews you have. More reviews and positive ratings can help your business’s local ranking.”
How can businesses adapt?
By following the tactics local businesses should already be doing to succeed in local search:
Focus on generating new, recent reviews.
Respond to both positive and negative reviews.
Read reviews to understand the strengths and weaknesses of your business. Seeing a trend in negative reviews? That could indicate it’s time to make some changes and address those weaknesses.
Monitor brand mentions not just for backlinks but also to understand what people are saying about your business online, including community forums, social media platforms, and online publications.
In addition to traditional review sites, platforms like Reddit, TikTok, and Quora are showing up more frequently in branded and local search results. These conversations are also being picked up and summarized in tools like Perplexity and ChatGPT. That means the things people are saying about your business in comment threads or short-form videos can influence how your brand is being represented across both organic and AI-powered results.
What else can be done:
Look closely at how your business is perceived online and do the same for your competitors.
Compare your review count and average star rating to those of businesses showing up alongside you in the Local Pack. How does your business stack up?
Check how AI tools like LLMs or Google’s AI Mode describe your competitors during branded searches and identify where they source that information.
Try asking AI tools to compare your business and a competitor. The way these tools summarize differences can give insight into strengths, weaknesses, and areas where you may need to improve to stay competitive in the market.
LLM data sources
LLMs pull from a range of online sources to build summaries about businesses. For local and branded search queries, much of the information they use closely mirrors what shows up in traditional organic search results. This includes data from:
Google Business Profiles.
Third-party review sites.
Official business websites.
Wikipedia.
Online directories and aggregators.
News articles.
Public conversations on forums or social media.
LLMs don’t use the same ranking algorithm as Google Search, but they rely on much of the same publicly available information.
Why this matters:
The efforts businesses make to improve local SEO, such as maintaining accurate listings, collecting reviews, and building authority, also help shape how their brand is represented in AI-generated search results.
Reinforces the importance of managing your presence across multiple platforms and staying aware of where your brand is mentioned.
Highlights trusted third-party sites where your business may be listed but not actively managed. These listings still influence visibility and should not be overlooked.
Identifies which platforms are trusted within your specific industry, revealing opportunities to strengthen your presence on niche or vertical-specific sites.
Managing reputation at scale for multi-location businesses
For multi-location and microbrand businesses, managing sentiment at the local level adds another layer of complexity. It is not just about how the overall brand is perceived, but how each location appears in search results. This is especially important for industries like senior living, apartment communities, and healthcare, where customer experience and trust are crucial in decision-making.
A few negative reviews tied to a single location can shape perception across the board. That is why reputation strategies need to scale while still staying localized. Each location needs a clear plan to monitor feedback, respond to reviews, and build a strong presence in both traditional and AI-powered search results.
Core local SEO principles remain
Search is evolving fast, and we can expect more LLMs and AI-powered features to continue to shape how information is delivered to users.
Customer sentiment and brand perception are now more important in shaping how a business appears online, whether it’s in traditional organic search results or another platform.
Why?
Because perception matters, both online and in real life. Tools like Google’s AI Mode, Perplexity, Gemini, and ChatGPT are putting reviews, ratings, and sentiment summaries front and center, making customer feedback more visible than ever.
Now is the time for brands to take a close look at how they appear in LLMs, understand the feedback being surfaced, and identify areas to improve. Doing this not only helps with visibility in AI-driven search but also strengthens your local market presence.
As part of a broader brand reputation and visibility strategy, it’s essential to regularly monitor how your business is showing up in both traditional and AI-powered search results. That includes checking branded SERP features like AI Overviews, People Also Ask, video carousels, and social content pull-ins. These elements shift often, and staying aware of what’s being surfaced helps inform both SEO and reputation efforts.
You don’t need to reinvent the wheel. To keep up with the changing search landscape, you just need to focus your efforts in the right direction.
https://i0.wp.com/dubadosolutions.com/wp-content/uploads/2025/08/running-store-near-me-google-ai-mode-FbvBhZ.png?fit=767%2C622&ssl=1622767http://dubadosolutions.com/wp-content/uploads/2017/05/dubado-logo-1.png2025-08-18 18:03:342025-08-18 18:03:34Want to win at local SEO? Focus on reviews and customer sentiment
You don’t need an SEO plugin to help your website rank in Google.
In fact, you can do more harm than good if you don’t know what you’re doing with them.
But:
They can make optimizing your website a whole lot easier if you do use them correctly.
We’re talking:
Faster page speeds
Better optimized content
Fewer technical SEO issues
All without touching any code.
So how do you choose which plugin to use? Can you use more than one?
And the big one — should you use Yoast or Rank Math?
You’ll get the answers to these burning questions below.
But first, here’s the tl;dr on the best SEO plugins for WordPress:
Best for
Pricing
Rank Math
Beginners looking for an all-in-one solution
Free version available; Pro plans start at $7.99/month, billed annually
Yoast SEO
Anyone in need of guided SEO setup and writing support
Free version available; Premium starts at $99/year
WP Rocket
Improving site speed and Core Web Vitals
$59/year for one site
The SEO Framework
Handling essentials with minimalist features
Free; paid versions for more sites from $7/month billed annually
Semrush SEO Writing Assistant
Writing better SEO content
Free; increased usage with a Semrush subscription
Note: We’ve stuck with plugins that can directly improve your SEO. You won’t see analytics plugins like Monster Insights or external keyword generators on this list. These are useful tools in their own right — but they’re not true SEO plugins.
1. Rank Math
Best all-in-one SEO plugin for new WordPress sites
Pricing: Free version available; Pro plans start at $7.99/month billed annually
Rank Math has pretty much everything you need in an SEO plugin. If you’re new to SEO, it’ll handle all the important stuff for you, including:
Content optimization
Image SEO
Internal and external linking
Local SEO
Schema markup
Sitemaps
Redirects
And way more.
It’s actually the go-to recommendation from our own Head of SEO, Leigh McKenzie:
“Rank Math is my no. 1 choice across the board. For any site starting from scratch, I’d always recommend Rank Math first.”
Let’s go through some of the features behind his recommendation:
Manage Metadata and Social Previews
Starting with the basics, Rank Math lets you manage your page’s SEO title, meta description, and how it appears on social media — right within the post editor:
It also lets you preview what the post will look like when you share it on Facebook and X/Twitter:
This gives you more control over how your content looks in SERPs and social feeds.
It’s a pretty rudimentary feature, and hardly one that separates it from the likes of Yoast below when taken in isolation.
But how your social content looks can have a big impact on the engagement your posts get — and how many people click through to read your content. So it’s a useful feature for those looking to share their content beyond their blog.
Get SEO Suggestions as You Write
Rank Math also gives you SEO guidance as you’re creating your content in the WordPress editor. Like having your own SEO assistant you can call on as you write.
It’ll highlight things like missing focus keywords in your meta description, intro, and throughout your content.
But honestly? I never use this feature.
So why am I calling it out here?
Because when you’re just starting out creating SEO content, it’s actually super helpful for keeping you on track.
Sure, once you’re familiar with the basics of content optimization, you’ll do all of this naturally. But as a beginner, this gentle guidance can help you learn faster (and create better optimized content in the process).
Plus, you can click “Fix with AI” to generate a suggestion and save time on the small changes.
It’s not going to be perfect. But for a one-click, two-second job?
I’ll happily use this, because it speeds up optimization.
Plus, you can tweak or regenerate the output anyway, so it’s useful as a starting point.
Broken Links and Redirects
Rank Math flags broken links on your site using its built-in 404 Monitor.
You can then set up a redirect right from the dashboard:
This feature keeps your internal links working. It ensures you’re passing authority between your pages and that you’re offering a good user experience.
It also reduces plugin bloat as you don’t need a separate plugin to handle broken links.
The fact the free version of the plugin comes with built-in redirection capabilities is a massive win in my book.
I’ve personally leaned on this particular part of the plugin heavily multiple times.
Firstly, it’s great for just quickly setting up redirects when you change the URL of a post (it even does this automatically).
But you can also set it up to move entire categories of posts or pages through the filters.
Just choose “contains” and you’ll be able to move all your content from /old-path/page to /new-path/page without your users even noticing — and without any hassle on your end.
I don’t see enough people praising Rank Math for the redirect functionality. But honestly it’s a lifesaver.
Downsides But Not Dealbreakers
Rank Math clearly has a lot of features, which is great. But it can also feel overwhelming at first. That’s just the nature of any “all-in-one” style plugin.
However, once you know where things are and what you need, it’s fairly easy to navigate.
Also, on the content improvement side of things, readability feedback is pretty limited. It checks basic things like paragraph length and image use. But it won’t help you improve sentence structure or tone.
(If you need more focus on that, check out the fifth plugin on this list.)
But overall, these drawbacks are pretty minor. Rank Math is still our number one recommendation if you need an SEO plugin.
2. Yoast SEO
Best for beginners who want step-by-step SEO guidance inside WordPress
Pricing: Free version available; Premium starts at $99/year
Yoast SEO is probably the first plugin you came across when you started looking into WordPress SEO. And for good reason — it’s installed on 10+ million sites and has around 26K five-star reviews.
It’s been around for so long and has such a clear purpose that its WordPress plugin directory URL path is literally just “/wordpress-seo/”:
It’s the second of the “big two” WordPress SEO plugins alongside RankMath, and it’s worth addressing why we put it second before we get into the details of the plugin itself.
In summary: We usually recommend Rank Math for a first-time WordPress site owner. It’s packed with features, and its free version has the edge over Yoast in a few areas. These include redirects, multiple focus keywords per post, and more extensive schema markup options.
But Yoast is pretty evenly matched in a lot of ways. Especially if you opt for the paid version.
In fact, this is the specific SEO plugin we use for Backlinko.
My personal recommendation is to try them both (separately) and see which one works best for you.
Note: Don’t use them both at the same time, as running multiple all-in-one SEO plugins on the same site can lead to compatibility issues.
Okay, now let’s go through what I like most about the Yoast SEO plugin:
Optimize Search and Social Previews
Like Rank Math, Yoast helps you optimize how your content appears both in search results and on social media.
You can easily update your SEO title, meta description, and URL slug for every page or post:
You also get a live preview of how your content will appear in Google search results and on socials.
It’s very similar to Rank Math in this respect. But I wanted to call it out here anyway as it’s some fairly fundamental functionality for a WordPress SEO plugin.
Get Real-Time SEO and Readability Feedback
Yoast analyzes your SEO as you write, using a simple green/orange/red traffic light system.
Green means you’re following best practices, while orange suggests there’s room for improvement. Red highlights critical issues you should prioritize.
Each suggestion is actionable, helping you easily optimize your pages, even if you’re new to SEO.
Yoast also gives you a detailed breakdown of your content’s readability.
You’ll see checks for things like passive voice, sentence length, and consecutive sentence starters. In this respect, it does offer a bit more than Rank Math.
My advice: Don’t chase all the green lights thinking it’ll help you rank. Content quality and value for the reader matter far more than hitting a certain percentage or score.
However, Yoast’s feedback does help you spot common issues and make your writing clearer for both users and search engines.
Like I said in the Rank Math section, I don’t personally use these features. But beginner me found himself looking to them quite a lot for basic guidance.
Manage XML Sitemaps
Yoast creates a dynamic XML sitemap for your site and updates it as you publish new content.
Here’s what it looks like for Backlinko:
This is a basic but very useful feature (Rank Math does this too).
Just make sure to submit your sitemap URL to Google Search Console. This helps Google discover and index your content.
Yoast’s SEO scoring system can feel rigid. For example, you might get flagged for not using your main keyword in the first sentence even if it doesn’t fit there naturally.
And I’ll often see site owners that are new to SEO sticking too closely to these guidelines and creating pretty mediocre content as a result.
But if you treat the feedback as guidance, not strict rules, Yoast can still be a helpful way to catch easy-to-miss issues.
Further reading: Learn more about the plugin with our full Yoast SEO guide.
A word on a few alternatives before I move on:
The all-in-one SEO plugin market is dominated by Yoast and Rank Math. But another big player we can’t forget to mention is aptly named All in One SEO (AISEO).
It does a lot of the same stuff as the other two, but they just do it better. It’s missing key free features like redirects, and it can get pricey if you want to use it on several sites.
Like I said earlier though, you should try these plugins out for yourself if you’re struggling to choose. The free options are more than enough in most cases, and they’ll give you a taste of what to expect should you want to commit to a paid option.
FYI: I don’t personally pay for any SEO plugins besides WP Rocket (more on that next). But we do use Yoast Premium on Backlinko and Rank Math Pro on Traffic Think Tank.
3. WP Rocket
Best for improving your website speed without needing a developer
Pricing: $59/year for one website, $119/year for three websites
WP Rocket is probably my favorite of all the plugins on this list, even if it’s not technically the best overall. It’s a performance plugin designed to speed up WordPress websites. That’s all it aims to do, and boy does it succeed.
I run a somewhat well optimized site, and here’s how it looks in PageSpeed Insights without WP Rocket installed:
After installing the plugin and turning on the most important features, here’s how it looks:
Again, it’s a decent baseline to begin with. But WP Rocket improves my site performance in ways I otherwise can’t manage on a site that’s quite heavy on the Elementor elements.
That’s an important point in itself: you 100% can make your site run fast without SEO plugins like WP Rocket.
But you will need to make sacrifices unless you’re an experienced developer (which I am not).
So if you also want to improve your site speed without digging into the code or harming your UX, here’s why you should consider WP Rocket:
Caching Made Simple
WP Rocket makes performance optimization easy. For example, I didn’t have to touch a single setting for the caching features to kick in, and you can clear your cache at the touch of a button:
This is a feature some WordPress hosts and other plugins offer (my own web host does, for example). But I like WP Rocket’s because it’s easy to do within a dashboard that also does so much more.
For a non-developer like me, this kind of out-of-the-box performance boost is extremely useful.
File Optimization
You can also dig into advanced settings to minify your CSS and JavaScript, optimize images and fonts, and connect to a CDN.
These tweaks can cut load time, reduce file sizes, and can even improve Core Web Vitals. In other words, they can have a major impact on your site speed.
(And as someone with no coding experience, there’s no way I could do any of this without a plugin.)
Now for the second and only other feature on this list that I’ll describe with the phrase “life saver”:
It comes with one-click exclusions for popular tools like Google Analytics, AdSense, and Stripe, along with other WordPress plugins, like Elementor:
That means you’re less likely to break your tracking, ads, payment processing, or UX while optimizing. Which, believe me, is easy (and frustrating) to do.
And you don’t need to dig through documentation to figure out what to exclude.
You can also create custom exclusions, and these are handy if you do know what’s causing issues.
Downsides But Not Dealbreakers
Some layout elements may break if you enable file optimization without adding exclusions. In my case, my Elementor post cards got distorted. But excluding the right files fixed it.
(Finding the right files to exclude took me a lot of trial and error, but your mileage may vary.)
The settings can also feel pretty technical if you’re not a web developer. I had to Google a lot before knowing what to toggle.
However, WP Rocket’s help center docs were solid. And once everything was dialed in, my site’s performance improved significantly. (Again, see the screenshots at the start of this section.)
Free alternative: When I first started playing around with WordPress websites, I used Autoptimize for a lot of the things WP Rocket does.
It’s not as extensive when you use the free version, but it’ll get you a meaningful chunk of the way there if site speed is a big concern for you.
Plus, I still run this on a few of my lower priority sites when I just want to tick the main performance boxes.
4. The SEO Framework
Best lightweight, minimalist SEO plugin
Pricing: Free; paid plans start at $7/month (paid yearly)
The SEO Framework is a free and lightweight plugin for WordPress that quietly handles the SEO essentials.
It’s no Rank Math or Yoast, but it will still do a lot of the most important things for you.
This plugin is popular among developers for a reason. It runs fast, doesn’t clutter your dashboard, and avoids the “all-in-one” bloat you get with other SEO plugins.
Here’s what you get with the SEO Framework plugin:
Get Instant SEO Feedback
One of the SEO Framework’s most helpful features is the plugin’s color-coded SEO bar. This gives you a quick visual of how well optimized your pages are.
At first, the labels can look a bit cryptic.
But once you hover over them, they explain what’s working and what needs improvement.
For example, the plugin flagged my meta title as “far too short” and noted that it was automatically generated from the page title. (At least I assume that’s what the “TG” means.)
It explained that the title lacked information, which helped me understand I’d need to customize it to improve its SEO performance.
Honestly, I’d maybe like a little more specific detail here. It’s not clear what “more information” it means. But it does make it easy to do a high-level audit of your content optimization without opening each page.
If it flags your title or description, you can open the page editor and tweak the meta fields directly to optimize them:
The SEO Framework also shows each page’s indexing status. If a page is indexed, it appears in green. If there’s an indexing issue, it tells you exactly what’s wrong.
In my case, it showed that all my published pages were indexed correctly. And a few unpublished ones were flagged, as expected:
Obviously it’s not going to be as in-depth as Google Search Console. But it’s a useful at-a-glance overview of your overall indexing status.
Automate SEO Title and Meta Description Generation
Once you find titles and meta descriptions to optimize, the SEO Framework automatically generates meta them based on your content.
But you can still tweak auto-generated meta elements to add more value as needed.
That’s it, that’s the feature.
It’s nothing fancy, and it’s not always perfect. But for a lightweight SEO plugin, this is a great timesaver.
You can also control how your page appears on social media. You can even add a custom image for Facebook or X:
If you like this functionality of the likes of Yoast and Rank Math but don’t need all the extra features, the SEO Framework plugin could be all you need.
Simple Base Plugin with Room to Expand
The SEO Framework is intentionally minimal to be fast, lightweight, and free of unnecessary extras. That makes it a great choice if you’re looking for something that won’t slow your site down or overwhelm you with options.
And if you ever need additional features, like schema markup, third-party connections, or local SEO support, you can always install them as separate extensions.
Downsides But Not Dealbreakers
The SEO Framework is lightweight, which means it’s also feature-light. It has the basics, but it won’t cover everything for you.
To get a bit pickier, I noticed that when I try to edit an automatically generated SEO title or meta description, the entire field clears as soon as I click it.
That means I can’t just tweak a few words. I have to retype the whole thing from scratch. It would be a smoother experience if I could simply edit the existing text in place.
But the fact this is such a small and specific issue is testament to just how good the plugin is.
5. Semrush SEO Writing Assistant
Best for optimizing your content for search right inside the WordPress editor
Pricing: Free, but you can optimize more content with an active Semrush subscription
Semrush’s SEO Writing Assistant helps you optimize content as you write it inside the WordPress editor. It’s not an all-in-one solution, and is purely content-focused.
It works by pulling recommendations from your target keyword and analyzing your draft in real time for SEO, readability, tone of voice, and originality.
Let’s take a look at my favorite features of the plugin:
Optimize Your Readability
Semrush calls out exactly what you need to fix to improve your content’s readability, including:
Sentences that are hard to read
Suggestions to use active voice
Specific words to swap for simpler alternatives
This is super useful if you want to make your content easier to understand and more engaging.
Improve Your On-Page SEO
The plugin also provides clear on-page SEO recommendations based on your target keywords.
At the top of the panel, it shows whether you’ve used your main keywords effectively.
When I created the blog post in the example below, I entered two main keywords: “content marketing” and “content marketing for small businesses.”
Since I used both naturally throughout the article, Semrush marked them green:
But below that, it suggests semantically related keywords based on content that’s already ranking well for these terms. As you include those terms, they turn green too:
This is where the Semrush plugin goes a step further than the likes of Yoast. It leverages Semrush’s data to give you a helpful way to improve your topical depth based on what’s already ranking — which is a key part of building topical authority.
Why does this matter?
Because search engines like Google are good at recognizing when a piece of content truly covers the topic in depth — rather than just using the target keyword a bunch of times.
When you include related terms, you’re showing Google that your content is contextually relevant and comprehensive.
Analyze Your Tone of Voice
Wondering what your content actually sounds like from a reader’s perspective?
The Semrush SEO Writing Assistant shows whether your writing comes across as casual, formal, or somewhere in between. And whether your tone stays consistent throughout the post.
For example, it labeled my draft as “Neutral” with 95% tone consistency:
That’s a helpful signal that the post flows well without jumping between writing styles.
That said, don’t let the score alone inform your edits. Instead, use it as a signal to evaluate your writing with fresh eyes and ask:
“Does this sound like me/my brand?”
It also pointed out a few phrases that sounded slightly off-brand. It then suggested alternatives to smooth them out:
They’re not always perfect suggestions, but it’s useful if you’re writing for a specific brand voice and want to keep it consistent across all your articles.
Downsides But Not Dealbreakers
The Semrush SEO Writing Assistant is not a comprehensive SEO plugin. It focuses on optimizing content for search engines and doesn’t replace Yoast or Rank Math.
So, it’s best to use it in combination with other SEO plugins.
http://dubadosolutions.com/wp-content/uploads/2017/05/dubado-logo-1.png00http://dubadosolutions.com/wp-content/uploads/2017/05/dubado-logo-1.png2025-08-14 14:41:192025-08-14 14:41:195 Best SEO Plugins for WordPress (Tried & Tested)
A few months back, one of my clients pinged me on Slack and said:
“We keep hearing on sales calls that ChatGPT says we don’t offer a feature we’ve had for years! How can we fix this?”
Sure enough, when prompted, ChatGPT confidently responded, “No, the platform does not have that feature, but this other competitor does!”.
For obvious reasons, this was worrying for the client.
Not only was ChatGPT spreading misinformation about their product, it was actively pitching an alternative solution.
The source of the misinformation: A single old blog post that hadn’t been updated in two years.
How many potential buyers decided not to book a sales call because of this?
How many had discovered a new competitor instead?
This issue signals a large shift in how bottom-of-funnel product research is done.
Before: Your website was the source of truth.
It was your “always on” salesperson. You kept your homepage and product pages fresh, and that was where buyers did their digging.
Now: Large language models (LLMs) are a product research assistant. A new touchpoint at a critical stage in the buying journey.
They’re the modern day gatekeepers, acting as the layer between you and your target audience, communicating on your behalf.
And their source of info? It’s often sources you’d forgotten even existed.
As marketers, it falls to us to make sure LLMs are communicating the right things in the right way about our products and services.
In this article, I’ll show you the 7-step playbook my team is developing to tackle this challenge — what we’re calling Branded Generative Engine Optimization (GEO).
Free resource: For step 6, we’ve created a handy spreadsheet to help you ideate common questions. Download it here.
What is Branded GEO?
Branded GEO is the process of making sure conversational AIs and LLMs give accurate, helpful, and up-to-date answers about your brand. It focuses on branded prompts and queries.
This targets a highly valuable audience segment, including those who are:
In the market to buy a solution or service like yours
Already know you are a viable option and are exploring your offer
This segment is showing the highest intent — they’re asking questions about your product, and they’re using your brand name in their prompts.
Like branded SEO, branded GEO is easier to influence. It’s more actionable than trying to optimize for broad industry queries. For that reason, it’s a fantastic starting point if you want to explore GEO.
Note:Generative engine optimization is the broader practice of optimizing for AI-powered search systems like ChatGPT, Claude, and Google’s AI Overviews. Branded GEO is a specific subset focused on branded queries.
For the following exercise, I’ll use ChatGPT as the LLM and the B2B SaaS product, Airtable, as an example.
Airtable has recently undergone some serious positioning and product pivots, so it illustrates the new challenges of branded GEO.
Let’s start with a quick setup.
Step 1: Set Up Your LLM
Head to ChatGPT and turn on temporary mode. This avoids any personalization skewing your results.
Also turn on the “search” feature — this ensures ChatGPT is accessing information after June 2024 when it was last trained.
This is currently the data we can influence.
Step 2: Enter Your First Branded Prompt
Next, prompt ChatGPT with a simple question: “What is [your brand name]?”.
Here are the results for Airtable:
Step 3: Analyze the Response
Pay attention to how ChatGPT describes your product and company.
Is it accurate? Is it how you would describe your company?
Or do things need to change?
With Airtable, we see what must be a frustrating situation playing out.
Airtable pivoted in June 2025, shifting away from their “super powerful spreadsheet” positioning and relaunching as an:
“AI-native app platform, where the magic of vibe coding meets enterprise reliability and the scalability of AI agents”.
That’s quite the change. And ChatGPT hasn’t caught up yet.
Here’s how Airtable positions themselves versus how ChatGPT does:
How Airtable describes themselves
How ChatGPT describes Airtable
Website: “Next gen app building platform”
“cloud-based, no-code platform”
Website: “Deploy thousands of agents inside your apps”
“simplicity of a spreadsheet with the power of a relational database”
Homepage meta title: “AI App Building for Enterprise”
“hybrid spreadsheet‑database”
LinkedIn page: “AI-Native App Platform”
Common use cases: “Project management”
Luckily, most readers are unlikely to see such a drastic mismatch.
But at the current rate of technological innovation, almost all companies are undergoing continuous reinvention, and so you are likely to find outdated features and positioning.
Step 4: Find the Source of Misinformation
In this step, we start to tackle the misinformation by looking for its source.
We usually find that ChatGPT has sourced its information from:
An outdated article
A LinkedIn page that hasn’t been updated in three years
A landing page that reflects the “old you”
A hallucination due to completely missing information on that topic
As a quick example, I was recently living in Melbourne, and ChatGPT picked that up from a LinkedIn post and stated that my agency, Spicy Margarita, was founded in Melbourne. (We’re based in the UK).
Despite my travel plans, I wasn’t keen to be positioned as an Australian company, so I quickly removed that mention of Melbourne, and ChatGPT’s response adapted.
To address the misinformation you find, visit the sources used and look for a match between the language used by ChatGPT and the words on the page.
See that it says you cost $1,000? Find the source that says that and update it. Fixing the issue is often this simple (unless there is hallucination, which we address in the next step).
To operationalize this process, collate all the sources driving misinformation into a spreadsheet and note down:
Whether that source should be deleted or updated
Specific text that needs to be changed
Specific text that needs to be added — for example, if a feature is missing, you can spell it out in the sources
For our Airtable example, we can see that a highly trusted source (Wikipedia) is currently out of date.
If we worked for Airtable, we’d start with the Wikipedia article. They should note this down and edit this page with their new positioning as soon as possible.
As a major, trusted source of internet knowledge, updating Wikipedia is likely to help influence LLMs, but it may not fix the positioning issue in one fell swoop.
Step 5: Publish, Update, or Delete Sources
For smaller brands with a relatively small web footprint, we find this task is more straightforward.
Take your latest positioning, messaging, and features, and make sure they are represented in key sources LLMs are referencing. Ideally, refresh every source that mentions your brand — from social media accounts to on-site and off-site web pages.
Brands with a larger web presence will find this task more challenging.
If, like Airtable, you have outdated articles written about you across 100s of websites you don’t control, outreach may need to be operationalized to update or take down those sources. If you have no luck with that, we’d suggest running a new campaign that seeds LLMs with lots of new sources that contain your up-to-date information.
Given sources like Zapier and Airtable’s own starter guide (pictured below) still have their old positioning, there’s more work to do.
Here’s the branded GEO adjustment we would make for Wikipedia:
Airtable’s Wikipedia Before
Airtable’s Wikipedia After
“Airtable is a spreadsheet-database hybrid, with the features of a database but applied to a spreadsheet. The fields in an Airtable table are similar to cells in a spreadsheet, but have types such as ‘checkbox’, ‘phone number’, and ‘drop-down list’, and can reference file attachments like images.”
“As of June 2025, Airtable now operates as an AI-native app platform, enabling users to build, edit, and automate production-ready business apps through natural-language prompts via its AI assistant Omni and embedded Field Agents.”
You may also find that LLMs are hallucinating something entirely. This can’t be fixed by updating or removing a source. This often happens because they didn’t find an answer in any sources.
If LLMs are hallucinating an answer, you’ll want to try to influence the answer by creating a source that answers the question with the correct information.
Start building a content roadmap with new topics to cover, directly answering those key questions your target buyer has.
These can be hosted on your blog or help center, and serve dual purposes: for branded GEO and as helpful sales material.
Step 6: Expand Your Branded Question Prompts
So far, we’ve asked just one question about your brand.
But, prospective customers are likely asking many, many questions that you’ll want to monitor.
Unfortunately, exact data on those questions is still not available.
Prompts are unlike traditional keywords. They’re often longer and more personalized. However, that doesn’t mean we can’t optimize for the less long-tail prompts and hope that bleeds through.
We can make educated guesses at the topics LLM users are asking questions about using six methods:
1. Ask Your Inbound Leads
I ask every inbound lead who found me via ChatGPT what their prompts and journey were. One even pulled the conversation up and read the exact prompt back to me — it said “I want an SEO agency in the B2B space who is staying up-to-date with AI,” and our agency came up.
This kind of insight is gold dust.
It shows you how your audience prompts, what issues they face, and what content and GEO efforts of yours are already working.
A similar technique is to look in sales insights platforms like Gong for mentions of ChatGPT and to encourage your sales team to ask the question for you.
2. Start With Common Questions
Begin with general questions that people ask about brands. Then, tailor those questions to fit your specific situation.
We’ve made a spreadsheet template to help you find the questions people ask AI about your brand.
3. Use a Keyword Research Tool
Head to your keyword research tool of choice and enter your brand name.
In Semrush’s Keyword Magic Tool, you can filter on “Questions” to pull a full list of the questions people are asking about your brand.
Find questions that someone considering your product might ask.
For example, these are a few I’d select for the Airtable before their pivot. Each question factors into the purchase decision.
Questions
is airtable free
how much does airtable cost
how much does airtable enterprise cost
is airtable only for apple
is airtable a crm
does airtable have a desktop app
can airtable send emails
does airtable integrate with outlook
can airtable be integrated into wordpress
can airtable be integrated with shopify
does airtable have an api
4. Use Google Autocomplete
Another helpful tool for finding audience questions is Google Autocomplete.
You’ll find autocomplete is a part of normal Google Search. It anticipates and suggests search queries as you type, making predictions based on popular searches, your location, and your search history (so do this in incognito mode).
Enter these queries to see what people are asking:
Is [brand name]
How [brand name]
Does [brand name]
Where [brand name]
When [brand name]
What [brand name]
You can get more suggestions by adding each letter of the alphabet afterward, too. Like this:
To speed things up, I recommend taking screenshots of each autocomplete and uploading them all to ChatGPT for extraction and grouping.
5. Use ChatGPT Autocomplete
If you’re lucky enough to be represented in ChatGPT autocomplete already (at the time of writing, only very large brands are), this is also a place to dig into.
6. Talk to Your Sales and Support Teams
When we do this exercise with clients, we run a Q&A session with both the sales team and customer support teams.
This first-party insight is invaluable for predicting the questions your target audience has.
Here are six top questions from our client questionnaire:
What common questions about your product do you get from prospects on sales calls?
What do prospects misunderstand or get wrong before speaking to you?
What common objections about your brand do you get from prospects?
Do prospects ever mention ChatGPT and what they found there?
What questions do people typically ask in your website chat about [brand name]?
What usually triggers prospects to book a call or sign up for [brand name] now?
Step 7: Repeat
Now you’ve gathered your questions, it’s time to see how LLMs answer them and fix up the answers.
To do this, repeat steps 1-5.
Tracking the Impact of Branded GEO Work
The impact of branded GEO is twofold:
Relief: From knowing you’re being accurately represented by LLMs.
Additional Conversions: From removing inaccuracies and misinformation, adequately filling content gaps in your lower sales funnel, and better informing buyers before they join sales calls.
To track the impact of this exercise, we recommend:
Monitoring LLM output: Take your list of questions and compare the before and after. Monitor those regularly to confirm continued accuracy.
Track conversion metrics: Compare key conversion rates (sign-ups, demo requests, sales) before and after your LLM content improvements. I suggest you add a “Where did you hear about us?” to your sales booking forms to closely monitor leads that started in LLMs.
Sales team feedback: With the example in the introduction of this article, the sales team had been facing misinformation issues. If you’ve faced a similar issue, stay in close contact with them so get a pulse check on the impact.
http://dubadosolutions.com/wp-content/uploads/2017/05/dubado-logo-1.png00http://dubadosolutions.com/wp-content/uploads/2017/05/dubado-logo-1.png2025-08-14 13:59:422025-08-14 13:59:42Branded GEO: How to Control What AI Says About Your Brand
The rules of app store optimization (ASO) are changing. What was once a tactical discipline focused on rankings and keywords is rapidly evolving into a strategic lever for user acquisition, brand visibility, and sustained app growth. With advancements in AI, shifts in search behavior, and the rise of hyper-personalized discovery, ASO is entering a new era, one that is contextual, intelligent, and continuously adaptive.
In this article, we explore the forces shaping the future of ASO, from AI-driven metadata and personalized search to voice discovery and predictive app visibility. If you’re looking to stay competitive in an increasingly saturated app landscape, this is what you need to know next.
Key Takeaways
ASO is shifting from tactical to strategic. It’s no longer just about keyword stuffing or climbing the rankings. The future is intelligent, personalized, and performance-driven.
AI is rewriting how metadata works. Expect real-time, AI-powered updates that align with shifting user behavior, not quarterly refreshes based on guesswork.
Search is getting personal. Two users can type the same keyword and see different results. Your listings need to adapt to individual intent, not the average user.
Customized Product Pages (CPPs) are just the beginning. Soon, app store experiences will be dynamic, predictive, and unique to each user journey.
Voice and ambient discovery are rising. People are finding apps through voice assistants and predictive surfaces, not just typed search queries.
App Intents will drive next-gen visibility. Apps need to signal what they do, for whom, and when—so platforms can surface them at just the right moment.
Success depends on adaptability. ASO teams that test fast, personalize creatively, and embrace AI will outperform those still chasing static rankings.
Where App Discovery is Heading Next
App Store Optimization is no longer just about rankings. As mobile ecosystems evolve and user expectations shift, the future of ASO will be defined by personalisation, predictive relevance, and deeper integration with emerging technologies.
We are entering an era where search is increasingly contextual, discovery is increasingly intelligent, and store listings behave more like adaptive marketing assets than static storefronts.
This section explores the trends shaping the future of ASO. From AI-powered metadata and personalized search to voice discovery and App Intents, we will unpack what marketers need to prepare for now, and where the next growth opportunities lie.
AI-Powered Metadata: From Static Copy to Intelligent, Performance-Driven Content
As AI becomes more embedded in the app ecosystem, metadata is evolving from something manually updated every quarter to a fluid, data-informed asset that adapts to audience trends, behaviour, and market shifts.
Instead of relying solely on guesswork and human intuition, AI is enabling metadata to be:
Continuously optimized based on live performance signals
Automatically localised for language, phrasing, and cultural nuance
Tailored dynamically for different cohorts and user segments
What This Means For Marketers
Metadata is no longer a static exercise in copywriting. AI allows marketers to test, learn, and iterate faster than ever before. With platforms like Apple and Google increasingly rewarding contextual relevance and behavioral alignment, brands will need to adopt:
AI-assisted keyword selection that reflects shifting user intent
Predictive copywriting that forecasts what combinations are likely to convert
Automated content scoring to prioritise which changes to make first
Strategic Implication
In the future of ASO, teams may move from monthly metadata refreshes to near-continuous optimization. Success will depend not just on creativity, but on how well marketers collaborate with AI tools to generate, score, and deploy high-performing content at scale.
AI will not replace ASO specialists, but it will raise the bar for relevance, speed, and strategic experimentation.
Personalized Search: The Shift From Relevance For All to Relevance For Me
In 2025, search is no longer a one-size-fits-all experience. Platforms are increasingly using on-device signals and behavioral patterns to tailor search results to individual users. This means that two users searching the same keyword may now see completely different apps.
This change brings enormous potential for marketers. With personalization comes the ability to surface your app in more targeted, contextually relevant ways – if your metadata, creatives, and reviews align with the user’s specific needs.
What’s Driving It:
The rise of personalized search is being fueled by increasingly sophisticated data inputs. App stores now consider user history, download behavior, device-level preferences, and even time-of-day patterns when determining what results to show. Rather than relying solely on keyword matching, search algorithms are layering in contextual data like app usage, cross-app engagement, and location signals to surface the most relevant content to each user.
What Approach Marketers Should Take:
Build out multiple value propositions and tailor your messaging for distinct segments
Focus on creative variety – consider how different screenshots or CTAs might resonate differently
Track shifts in keyword performance that may signal emerging personalized search patterns
Localize not just for language, but for lifestyle and behavior trends in key markets
Strategic Insight
In a world of personalized search, brands that maintain a single, static value proposition will lose ground. The winners will be those who treat the store listing like a modular experience, ready to adapt to any user, any context, at any time.
The Future of Smarter Acquisition
As acquisition costs rise and attention spans shrink, smarter acquisition has become a brand imperative. What CPP(customized product pages) represent today, a personalized, intent-driven storefront, may soon evolve into real-time, AI-curated experiences that respond dynamically to user segments, behavioral signals, and even market trends.
App stores ranking pages not just by keywords, but predicted conversion likelihood
Generative creative automation driving thousands of micro-variations of CPPs
Increased interplay between web-to-app journeys and personalized store listings
For now, success depends on smart targeting, creative alignment, and relentless iteration. The brands that win in this new era won’t just outspend competitors; they’ll outsmart them through relevance, efficiency, and a store presence engineered for performance.
Voice Search and Ambient Discovery: Adapting ASO to a Screenless, Spoken Future
As voice assistants become more embedded in our everyday lives, from smart speakers to wearable devices, the way users discover and interact with apps is evolving. App discovery is no longer confined to a screen and a search bar. Instead, users are increasingly asking for solutions out loud: “Find me a meditation app” or “Book a table nearby.”
This trend toward ambient, voice-led search means apps need to be discoverable through spoken queries and understand natural language requests. It places a new emphasis on clarity, semantic relevance, and metadata that mirrors conversational phrasing.
App names and descriptions must reflect how people speak, not just how they type
Metadata should include phrases that align with voice query patterns and real-world language
Reviews and ratings (often read aloud by assistants) need to be clear, credible, and compelling
Strategic Implication
The rise of voice doesn’t eliminate traditional ASO. It extends it. Brands must begin adapting their optimization strategy for a future where discoverability happens in a hands-free, multi-modal world, one where clarity, brevity, and natural phrasing win out over dense keyword stacking.
App Intents and Predictive Surfaces
As operating systems become smarter and more anticipatory, app visibility is no longer confined to the app store itself. Platforms like iOS and Android are increasingly surfacing app functionality through features like Siri Suggestions, Spotlight Search, and predictive app actions. These are powered by App Intents – metadata and signals that help the system understand what your app can do and when it should be offered.
In essence, your app can now be discovered without being explicitly searched for, if it fits the context of what a user needs at the right moment.
Why This Matters
App Intents allow apps to:
Appear in Spotlight or voice search based on user behavior and context
Trigger recommended actions like rebooking, ordering, or continuing where a user left off
Surface key functionality (e.g., tracking, booking, paying) without opening the full app
Strategic Opportunity
Optimizing for App Intents isn’t just about technical configuration; it’s about anticipating use cases. What are the moments where your app solves a problem quickly? How can you expose those actions to the OS?
The future of discovery is ambient, predictive, and frictionless. Ensuring your app communicates its capabilities clearly and is structured to surface in those contexts will be a core part of ASO strategy going forward.
What Comes Next
The evolution of App Store Optimization is not about abandoning the fundamentals, it’s about expanding what they mean. Keywords still matter. Visuals still matter. But context, intelligence, and adaptability now define who wins attention and who gets overlooked.
As platforms get smarter, ASO must become more predictive. As user journeys get messier, store listings must become more modular. And as expectations rise, marketers will need to work faster, test more deeply, and collaborate more broadly across product, performance, and creative teams.
If you need help with your ASO strategy, you can learn how our team can help you by contacting us here.
http://dubadosolutions.com/wp-content/uploads/2017/05/dubado-logo-1.png00http://dubadosolutions.com/wp-content/uploads/2017/05/dubado-logo-1.png2025-08-12 19:00:002025-08-12 19:00:00The Future of ASO: Adapting to Intelligent Discovery
After several weeks of testing, Google is rolling out the Preferred Sources feature in the US and India. This feature lets searchers specify which sites they want to see in the Top Stories section of Google Search.
Google announced this feature is now graduating Search Labs beta, specifically in the US and India. Google added that it “is designed to give people more control over their Search experience, by enabling them to select the sites they want to see more of in Top Stories, whether that is a favorite blog and their local news outlet.”
How it works. This is currently only available in English in the U.S. and India.
Then you click the starred icon to the right of the Top Stories header in the search results. After you click the star icon, you will have the option to select your preferred sources, that is if a site is publishing fresh content.
Google will then start to show you more of the latest updates from your selected sites in Top Stories “when they have new articles or posts that are relevant to your search,” Google added
Google added. Google added that “people really value being able to select a range of sources — with over half of users choosing four or more.”
Labs users. If you’ve previously signed up in Labs, your selections will automatically apply and you’ll continue to see more of those sites within Top Stories. You can always change those selections at any time.
https://i0.wp.com/dubadosolutions.com/wp-content/uploads/2025/08/Preferred-Sources-How-To-3BwDSA.webp?fit=2000%2C1000&ssl=110002000http://dubadosolutions.com/wp-content/uploads/2017/05/dubado-logo-1.png2025-08-12 15:00:002025-08-12 15:00:00Google Preferred Sources rolling out in US and India
If you’re not paying attention to search trends, you’re already falling behind. And in 2025, falling behind means losing visibility, traffic, and revenue, often to the tune of thousands (or millions) of dollars.
Some marketing pros and SEOs still haven’t learned this lesson. Maybe they don’t have the budget to invest in video, or a specific algorithm update doesn’t move the needle enough to get their attention.
And there are still CMOs who think AI doesn’t pose a big risk to their strategies, and other C-suite members continue to ignore the sunk cost fallacy.
Trends matter, though. Staying ahead of the curve matters. And right now, that curve is moving fast. Miss one core update or shift in user behavior, and you’re already behind. A single minute’s hesitation could set you back months.
The SEOs who are proactive, not responsive, are the ones winning big.
Take AI Overviews and Search Everywhere Optimization, for example. These trends have taken off and will continue to define the future of search. Let’s look at these and other big trends dominating search.
Key Takeaways
AI search has spread beyond Google. ChatGPT, TikTok, and YouTube are now regular search platforms for users.
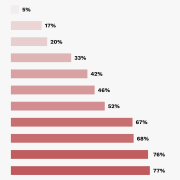
44 percent of sites have seen flat or declining traffic since AIOs launched.
Zero-click will make featured snippets, AI Overviews, brand mentions, and conversational content key.
Brand mentions have serious SEO value. As much as 78 percent of marketers consider them a key visibility factor in 2025.
Winning in search now means adopting a Search Everywhere Optimization strategy that spans AI tools, video, social, and traditional search engines.
We talked to two groups to better understand how AI and other trends impacted how people used search; in one survey, we spoke to 1,000 American adults with general questions. In addition, we reached out to 600 American full-time professionals who worked in marketing, market research, sales, and advertising.
AI Overviews Take Center Stage After Some Growing Pains
Google’s AI Overviews (AIOs) had a rocky start, but they’re not going anywhere.
After rolling out globally in May 2024, AIOs quickly took a spot in all kinds of search results, but not without hiccups; in our survey of general adults, users got answers faster, but they weren’t always better. Almost 25 percent of users reported major errors. Over 50 percent said their biggest issue was just flat-out inaccuracy, to the point of danger.
That said, most users (almost 75 percent) haven’t noticed major problems. And despite some early skepticism, AIOs are already shaping how people consume content in search, with some fears that web traffic will fall off as the search giant continues its efforts to keep users on the SERP instead of clicking through.
From a traffic perspective, our survey showed 44 percent of marketers reported decreased web traffic since AIOs launched. With that said, 48 percent saw a revenue boost from ads and affiliate links. It’s a strong signal that AIOs are about more than visibility changes; they are changing the rules of the game.
So, how do you get your content to show up in AIOs? The structure matters. No matter what you (or your content team) are writing, start by focusing on:
Clear, concise answers high on the page
Use of headings to mirror search queries
Schema markup that clarifies context
High E-E-A-T (experience, expertise, authoritativeness, and trustworthiness) signals
A conversational tone (yes, even in technical content)
And don’t forget freshness. AIOs pull recent, relevant content first.
Showing up in AI Overviews is more than just bragging rights. It’s taking up a valuable position in the new top-of-SERP real estate. Ignoring AI SEO and failing to optimize for it just gives visibility away.
How Marketers Can Work Around Zero-Click Search
AI Overviews are part of the growing wave of zero-click searches. In a zero-click world, users get their answers directly on the SERP; no further reading necessary. Featured snippets, local packs, people-also-ask boxes, and AIOs have all made organic traffic harder to win.
But that doesn’t mean you’re out of options.
Marketers are adaptable, and this development is no exception. Forty-three percent of marketers have changed their content strategies to respond to this shift.
Their focus now? Clear, scannable content that answers questions upfront. Structured data, brand mentions, and conversational formats are more important than ever.
The goal isn’t just to rank. It’s to show up in the spots users see first.
AI Mode flips the switch on how Google displays search results. Instead of the classic link list, users now see AI-generated summaries by default, especially for complex or open-ended queries.
According to Google, the goal is to “make search smarter and more helpful with generative AI.” Their idea is to offer a faster path to answers, context, and decision-making.
The reaction? Cautiously optimistic.
Our survey shows over 57 percent of marketers already knew about AI Mode’s debut. Of those, 74 percent believed it could improve the overall search experience, with nearly a third expecting “notable” usability improvements.
But user experience isn’t the only concern. It’s a signal to marketers, too. AI Mode will likely increase zero-click results and shift keyword targeting strategies. That will push creators to optimize for summaries, not just snippets.
According to Nikki Brandemarte, Sr. SEO Strategist at NP Digital, one of the best ways to optimize for AI Mode is to focus on tactics we’ve known work for a while, but even more.
Lock in on featured schema, prioritize context-rich introductions, and use conversational formatting. Freshness and clarity win the day, too, so regularly revisit your content and adjust it. Or write something new and authoritative. That’s especially important, since AI Mode can now source information published within the last 24 hours.
Brandemarte explains: “[AI Mode] is designed for users to ask more complex, multi-part questions that go beyond basic information provided by traditional AI overviews. These more comprehensive, better-structured answers expand on AIOs and overlap.”
The bar is higher. But if your content is clear, helpful, and well-structured, AI Mode can amplify your visibility (not erase it).
AI Search Is Spreading as a Concept
AI-powered search didn’t stop with Google, and it’s not going to, either. We’re now in a landscape where search is becoming a feature as opposed to a destination.
AI search is everywhere: ChatGPT, Microsoft Copilot, and even AI-driven tools built into apps you open every day, like Reddit, TikTok, or YouTube. Thirty percent of our surveyed general online users now turn to ChatGPT or SearchGPT at least 10 times a week.
On the marketer side, 74 percent actively watch ChatGPT, and 41 percent track Microsoft Copilot.
That shift is actively reshaping user behavior. AI summaries are now the first impression. Thirty-one percent of users trust AI summaries more than traditional search results.
Regardless of your thoughts on AI search’s efficacy and accuracy, it’s a trend you can’t ignore.
How to Minimize Risk and Stay Visible
If your brand isn’t visible across multiple ecosystems, you’ll be left behind. That’s the ethos behind Search Everywhere Marketing, and we take it very seriously.
Right now, only 51 percent of our surveyed marketers are actively tracking their brand visibility in AI search platforms. This is despite the fact that out of our surveyed marketers, brand visibility tracking was seen as the most popular way it would impact search strategy in the next year (45 percent). That means that there’s a shift many marketers know is coming, but aren’t prepared for.
What can you do if you’re in that group? Well, here’s how to catch up:
Monitor traffic shifts with Google Analytics and Search Console (GSC). They’re still your first red flags.
Set up trend logging to detect drops or spikes in branded queries.
Use social listening tools to track brand mentions in places like AI Overviews and conversational search results.
Build brand mentions through PR and content syndication. More than three-fourths of our surveyed marketers say brand mentions are vital for SEO, so this is no longer optional.
Lean into conversational content. Google and AI platforms favor content that answers naturally phrased questions.
The bottom line is that visibility isn’t about blue links alone anymore. Your content has to be everywhere that people ask questions, even if they never click.
Marketers Need to Find Ways to Start AI Visibility Tracking
If AI-driven search is the future, visibility tracking is how you future-proof your content.
Right now, most AI platforms don’t offer direct analytics. You won’t find a neat report in Google Search Console labeled “AIO Clicks.” Even though people have asked (repeatedly).
That’s a problem. As AI summaries and chat-based search tools like ChatGPT take up more screen space, marketers are beholden to something like a vibes-based approach.
As we noted above, only 51 percent of marketers track brand visibility in AI search. The rest are either exploring tools (38 percent) or not tracking at all. That’s a big visibility gap, but it’s also where you can find a competitive advantage:
Until native tools catch up, marketers have a blend of tactics. You can try to monitor traffic shifts in GA and GSC for early signals and use social listening platforms to track branded mentions and snippets.
Savvy users of platforms like Semrush can use it to help track AIO appearances, too. For priority keywords, log trends manually if necessary (even via screenshots).
AI visibility isn’t going away. Don’t neglect it.
Along with existing SEO tools and program suites, there are other products that are designed to meet the specific needs of the AI space. Profound is an AI search optimization tool designed to track important AI-related performance metrics like AI search such as sentiment, citation frequency, and AI share of voice.
Finally, monitor referral traffic from LLMs like ChatGPT or Perplexity. Currently, 24 percent of marketers have seen consistent traffic from those sources.
Google vs. LLM Referral Traffic: What’s Coming Out on Top?
For the first time in decades, Google isn’t the only game in town for search-driven traffic.
LLMs like ChatGPT, Perplexity, and Claude have started to chip away at Google’s dominance. Given that nearly a third of users say they use ChatGPT or SearchGPT per week, and how many marketers see consistent referral traffic, the shift is subtle, but it’s happening: It’s not just curiosity. It’s a behavior change.
Ready for something even more telling? As much as 34 percent of marketers believe AI tools will account for 25 to 50 percent of search activity within the next year. Some think the number could go even higher.
Keeping your brand discoverable as LLMs grow is absolutely vital, but it’s not as complex as you’d think.
We’ve touched on many of the tactics already: Focus on meeting conversational queries with clear, fact-rich content. Monitor your referral traffic from known LLM browsers and tools.
Most importantly, diversify your strategy. Think beyond “ranking” and more about being referenced.
Short-Form and Conversational Content Are at a Premium
In a world of AI summaries and zero-click search results, brevity is everything.
Short-form, conversational content is easier for AI models to parse, summarize, and cite. If your post or article buries the answer in paragraph five, you probably won’t be featured in AI Overviews (or any other generative snippets).
Tactics like including FAQs, key takeaways, and “too long, didn’t read (TL;DR)” sections are almost mandatory. AI tools seek out and prioritize structured, scannable, and intent-matching text blocks.
Nearly 42 percent of marketers already optimize new content for conversational queries, and 58 percent are refreshing their existing content to meet these new standards.
But keep one thing in mind: This isn’t about “dumbing things down.” Instead, it focuses on getting to the point—fast—and in a way that mimics how users ask questions out loud.
What can you do to help? Use headers that sound like real questions. Keep your answers clear and focused. When possible, use schema markup to reinforce the content’s structure.
Our TL;DR? Keep it short, smart, and skimmable if you want to be quoted.
Our Key Takeaways from a recent blog demonstrate a TL;DR approach to sharing information.
Tailoring Your Content to Fit Preferred Platforms
Ranking alone isn’t enough. Your content also needs to fit where your audience is searching.
Depending on your brand and audience, that might look like long-form blog posts to show up in Google, or it could mean creating vertical videos for TikTok. Other solutions could include product explainers on YouTube or visuals to engage Instagram users.
Younger audiences have already begun to shift search behavior. Platforms like TikTok, YouTube, and Instagram are their go-to sources for product discovery, how-tos, and health information. Sixty-seven percent of Gen Z users prioritize Instagram for search, while 62 percent focus on TikTok. As a result, over 63 percent of marketers have already started to optimize or test content for these channels.
How can you keep up?
Start by adapting your message to the format. Use generative engine optimization (GEO) for AI search, vertical video for TikTok and Reels, and snackable visuals for platforms like Pinterest and Instagram.
An overarching strategy that uses different platforms to meet the same goal: Meet your users where they are and speak their language.
Backlinks vs. Brand Mentions: Where Should Marketers Focus?
Backlinks have long been a pillar of SEO and still matter a lot. But the AI-driven, zero-click environment emphasizes and incentivizes brand mentions, too. What’s the difference between them?
Backlinks are clickable URLs that pass SEO equity.
Brand mentions are unlinked references to your company or product. Think name-drops in articles, podcasts, and social posts.
Google has hinted for years that brand mentions influence trust and authority. With AI platforms pulling in content and citations differently, those mentions are more valuable than ever.
Seventy-eight percent of marketers in our survey say brand mentions are at least “moderately important” for visibility. Thirty-two percent call them “extremely important” signals.
They’re so important that over 65 percent of marketers are already prioritizing mention-building with PR, guest posts, social campaigns, and influencer outreach.
So, which one should you focus on more? Mentions or links?
Both still matter, but the emphasis or split depends on your niche. E-commerce brands, for example, often see big returns from unlinked mentions in product roundups or reviews. B2B brands may still rely more heavily on authoritative backlinks.
The balance lies in knowing which one to prioritize and when.
Search Engine Optimization Evolves to Search Everywhere Optimization
Let’s be real. Google isn’t the only place your audience is searching anymore. That means traditional SEO—a Google-focused effort—isn’t enough. As we’ve touched on above, what you need now is Search Everywhere Optimization.
The concept is simple, and it’s something many marketers have done for years, if not as a focus: Instead of optimizing for Google’s algorithm alone, make sure your content is discoverable wherever your audience hangs out online.
According to our survey, more than 60 percent of users regularly search on at least one non-Google platform (ChatGPT, Reddit, TikTok).
Meanwhile, 55 percent of marketers say they’re investing in alternative traffic channels like paid social, email, or native ads to counterbalance any potential losses thanks to AI search.
What does this look like in practice?
Publishing educational content on YouTube and optimizing Shorts
Creating bite-sized, searchable videos for TikTok and Instagram Reels
Building credibility with appearances on podcasts and community platforms like Reddit
Getting cited in AI tools like ChatGPT
Using email and push notifications to bring users back to you
Remember, we’re not abandoning SEO. We’re expanding our strategy.
Conclusion
AI has turned the world of search completely upside down, and there are still a lot of variables to account for. But that doesn’t mean you can’t proactively start taking steps to position your brand for success.
Last year, we mentioned that content volume isn’t as important as content quality. That’s still true. Keep a regular cadence but focus on shorter, quality content that AI Overviews can pull from.
As more brands rely on AI to help produce content at scale, you can prioritize building your brand with consistent messaging across all channels; that’s Search Everywhere in motion. If you’re not confident about leveraging these strategies or trends, why not partner with someone who can? Contact the NP Digital team today for a consultation.
http://dubadosolutions.com/wp-content/uploads/2017/05/dubado-logo-1.png00http://dubadosolutions.com/wp-content/uploads/2017/05/dubado-logo-1.png2025-08-12 14:00:002025-08-12 14:00:002025 Organic Search Engine Trends: How Search is Evolving for AI and LLMs
Excited to launch your website, but how to drive traffic to your website? A beautifully designed site without visitors is like a shop with no customers — that’s why traffic matters. Wondering how to get visitors to your site? You’re in the right place. In this post, we’ll walk you through simple yet practical tips on how to drive traffic to a website and attract your first visitors, and even better, keep them coming back.
By the end of this guide, you’ll have a clear roadmap for improving your website’s visibility.
Why is driving traffic to your website important?
Well, you want people to discover your website and not just keep it to yourself within the design drafts; therefore, driving traffic is important.
Website traffic is the number of website visitors over a set time. It’s not just a vanity metric—it represents potential customers, greater visibility, and stronger brand awareness. If you’re just getting started, boosting your search visibility can feel overwhelming. However, by following these simple and practical tips, you’ll start to see your traffic grow exponentially.
Top 5 practical tips to boost website traffic
Here are the top 5 tips that will help you drive traffic to your website:
Understand your target audience
Before you dive into posting content on your website’s landing pages, it’s crucial to take a step back and ask yourself: Who am I trying to reach? Defining your target audience is the very first step if you’re serious about learning how to drive traffic to your website.
Creating content that resonates and drives engagement becomes much easier when you know your audience — their interests, challenges, and goals. Without audience clarity, even your best-written content might be a mismatch, targeting everyone but reaching no one.
What time of day does your audience visit your website
Which age groups are engaging with your content
Where your visitors are located
And much more!
Feeling lost when looking at analytics data? Don’t worry — you can check out this guide on Google Segments to help bring clarity to your dashboard.
Focus on SEO basics
Getting the SEO basics right is the easiest way to boost organic traffic to your website. It also makes it easier for search engines to understand the content on your website and index pages to make them accessible to searchers.
Here are some beginner-friendly SEO techniques for website traffic:
Add keywords naturally
Keywords play an essential role in boosting the searchability of your website. Think of keywords as phrases used by search engines like Google to match your content with what people are searching for. Do keyword research so your content matches what people are searching for. Once you’ve identified the relevant search phrases, sprinkle them contextually in important spots like headings, content, and alt texts.
Here’s a video for you:
Write clear and structured headings
It’s not just about writing content to incorporate keywords; presentation matters too if you want the readers to stay on your website. Therefore, it’s important to write content that is pleasant to the eyes and readable.
Organize your content with H1, H2, and H3 tags. Clear headings make your blog posts and landing pages easy to scan, improve readability, and help improve visibility on Google.
Add meta descriptions
Meta descriptions appear under your page title in search results. Although they don’t directly boost rankings, they encourage clicks, helping increase website visitors. Make them short, relevant, and inviting.
Use descriptive alt text for images
Alt text helps search engines “read” your images and makes your website more accessible. In fact, according to EU stats, a large portion of users with disabilities depend on well-structured web content to browse effectively.
Invest in seo tools to make it easier
Managing all these tasks can feel overwhelming at first. That’s why using beginner-friendly SEO tools can make a big difference. For example, the Yoast SEO plugin offers real-time suggestions for keyword usage, readability improvements, meta descriptions, and technical SEO essentials like XML sitemaps—all inside your WordPress dashboard. Some features, such as advanced keyword optimization and certain integrations, are available in Yoast SEO Premium.
Plus, with Yoast’s built-in integration with Semrush, you can access high-performing keywords with just a few clicks, and that too without even leaving your editor.
Also, with Yoast’s newly launched Site Kit by Google insights integration, you can take your SEO management to the next level. Instead of switching between different tools to check your site’s analytics and search data, you’ll see key insights—like organic traffic, impressions, clicks, and bounce rates—directly in your Yoast Dashboard.
A smarter analysis in Yoast SEO Premium
Yoast SEO Premium has a smart content analysis that helps you take your content to the next level!
AI-driven search is transforming how people discover information. Search results are no longer just a list of blue links—they’re increasingly delivered as direct, conversational answers through platforms like ChatGPT, Perplexity, and Claude. If your brand isn’t showing up in the answers your customers see, you’re missing a significant visibility opportunity.
Studies show consumers rely on AI-generated responses for nearly 40% of their searches.
To improve your chances of being featured in AI-generated answers, start with the basics: use relevant keywords, write clear and concise copy for your webpages, maintain a well-structured hierarchy with proper headings, and craft descriptive meta titles and descriptions.
With just one click, Yoast SEO generates an llms.txt file that enables AI bots to scan specific parts of your website in real-time, ensuring they accurately present your brand when answering user queries.
Create quality content that provides value
Content is king — but only if it’s high quality. Once you have identified your target audience and completed your keyword research, it’s time to start publishing content on your website. Remember, you’re not just publishing keywords — we share that you’re creating content that solves problems and answers real questions. Valuable content builds trust, boosts engagement, and naturally increases website visitors.
Need help checking your content’s quality? Try Yoast’s Real-time Content Analysis editor to assess readability and SEO performance as you type, on the go!
Leverage social media to share and increase the reach
63.9% of the world’s population uses social media, which is a huge number waiting to be tapped. Social media platforms are powerful and free tools that help you drive traffic to your website. Posting regularly on your social media helps boost brand exposure and serves as a traffic channel for your website.
But here’s the key — don’t just drop links and disappear. Add a personal touch: explain why your post is valuable, start a conversation, or ask a question. You can even repurpose your blog posts into bite-sized social media content to reach more people and channel your followers back to your website.
With its social previews feature, the Yoast SEO plugin takes your social sharing game up a notch. Instead of guessing how your post will look when shared, you can see an exact visual preview for Facebook and Twitter right inside your editor.
This means you can fine-tune your title, description, and image before hitting publish, ensuring your post looks click-worthy and on-brand wherever it’s shared.
Keep your site fast & mobile-friendly
Website speed and mobile-friendliness are crucial factors in attracting traffic and retaining it. If your website is slow or hard to use on mobile, visitors will leave before reading a word..
Page speed impacts user experience and SEO, and search engines like Google prioritize fast-loading websites. If your website is slow, it may experience higher bounce rates, because users want instant access to information.
The five core strategies above will set you on the right path—but why stop there? If you’re ready to go the extra mile in learning how to drive traffic to your website, try these bonus tactics:
Build an email list
Offering a valuable freebie (ebook, checklist, or discount) in exchange for emails remains one of the best strategies to drive traffic to a website. Once subscribers opt in, send them helpful newsletters that solve real problems rather than just promotions. Over time, this nurtures trust and encourages repeat visits.
Off-page SEO for link building
Off-page SEO—earning links from other reputable sites—signals authority to Google and helps you grow your search visibility. Guest posting on industry blogs, forming partnerships for co-authored articles, and outreach for natural backlinks are proven ways to drive quality traffic to your website.
Active participation in Facebook groups, LinkedIn communities, Reddit threads, and Quora spaces related to your niche gives you direct access to potential visitors. First, add genuine value—answer questions, share insights—then naturally reference your blog posts when relevant. This free method to grow website traffic fosters credibility while driving organic clicks.
Local SEO
If you own a business with a physical address, local SEO is your savior.
Local SEO refers to the practice of optimizing your website to attract people searching the “nearby…” keyphrases. It is a technique that helps you get searchable both online and offline.
Here are some basic local SEO practices that you can follow:
Claim and optimize your Google Business Profile:
Include location-specific keywords, such as “family dentist Chicago,” in your page titles, headings, and meta descriptions.
Earn citations in local directories such as Yelp, Yellow Pages, etc.
Encourage customer reviews.
If you want to rank your website locally and on Google Maps, do check out Yoast Local SEO plugin for WordPress.
Ready to drive traffic to your website?
Driving traffic to your website is not about quick wins—it’s a marathon. With consistent efforts and offering value to your audience, you will see long-term benefits, and your website will top the SERPs.
Keep refining your on-page SEO and publishing content that truly resonates with your audience. By applying the tips mentioned in this guide, your website’s visibility will gradually boost.
http://dubadosolutions.com/wp-content/uploads/2017/05/dubado-logo-1.png00http://dubadosolutions.com/wp-content/uploads/2017/05/dubado-logo-1.png2025-08-12 13:11:262025-08-12 13:11:26How to drive traffic to my website
Search is changing. The industry as we know it will radically alter in almost all aspects as we enter the “generative economy.”
By 2034, the generative AI market is expected to be worth roughly $1 trillion.
This article outlines how SEO professionals can own the generative economy and why they must embrace the change that is coming.
No, it’s not ‘just’ SEO
While there are many cross-over skills, GEO isn’t just SEO.
SEO works on the premise that ranking on page one for keyword variations that are typed into search engines by potential customers.
It matters because, for the last decade, the best place to hide a body has been on Google’s Page 2.
Humans don’t scroll past Page 1, because it is highly inefficient to do so.
LLMs and AI-powered search platforms don’t have this problem.
They can visit hundreds of websites in seconds for a variety of search terms and use their internal data.
Ranking does not matter in this world.
You can be on Page 5 of a web search and still get found and chosen by the LLMs.
Search engines organize the world’s information, and they do this exceptionally well.
Humans, however, are terrible at searching.
And this is among the largest differences between SEO and GEO.
Humans are being replaced in this process.
In SEO, businesses have been taught to target keywords that drive the largest potential commercial match.
But that doesn’t equal the best customers.
This is because keywords have represented the only way for humans to find what they want online, which means broad keywords drive the largest commercial terms.
And the long tail tended only to be a few words long for much the same reason.
Businesses only went after lucrative terms to win the most commercial traffic.
Or if deemed “too difficult,” SEO was turned into a blog channel, targeting non-commercial terms.
AI-powered search changes this.
It is easier than ever for consumers to find the products or services that best match their needs.
Ranking on Page 1 is no longer the goal. So what is?
How to win the generative game
AI search is vastly better than human search, so it will likely become the dominant form of search online.
Organic search will not disappear completely. It does a perfect job of surfacing businesses through direct or navigational search.
However, for situations where a chosen product or business is not known, AI-powered search will be able to find the best match – and fast.
It’s easy to see why this is so valuable for businesses.
A business can find the consumers it seeks to serve more easily.
A business will convert customers faster.
A business will be able to identify and indeed expand into new markets where customers are currently being either ignored or poorly serviced by existing providers.
Often, these customers have been ignored because a brand’s profit margins are insufficient in these sectors.
AI-powered search changes this.
It will allow more businesses to activate organic search as a driver of revenue.
This is because GEO has a different value proposition.
How GEO works – and why SEOs are best placed to help
Generative engine optimization is all about understanding the information AI search platforms need and supplying this information.
And what they need is “mutual information.”
Machines hate ambiguity.
GEO is about supplying enough information about a brand’s positioning so that, when someone uses an LLM to find a solution to a problem the business solves, the likelihood of that LLM referencing the business increases.
Say you need an employment solicitor offering free online consultations.
Traditional SEO targets a keyword like “free online advice for employee rights.”
An LLM instead:
Breaks down your request.
Searches across multiple queries.
Weighs everything from case studies to testimonials before recommending a firm.
However, most businesses are considerably underoptimized for LLMs.
In our example, you might offer a free consultation on employment law.
Other elements, such as not explicitly stating that you service the whole of the UK or that you specialize in sexual discrimination and have case studies on your site detailing your wins, might exclude you from being returned in a generative result that matters.
You must supply the “machines” with enough information to increase the likelihood that they are “certain” you are a good solution for their user’s query.
You must satisfy the machines. AI is the gatekeeper now.
If this sounds just like good SEO, yes, you’re right, it does.
The difference here is that you’re not chasing keywords.
You’re optimizing for online presence in terms of the business’s positioning.
This means that the business needs to have a position in the first place.
Many businesses have been built around organic or paid search keywords.
SEO and or paid search has allowed them to win big.
AI-powered search changes the game considerably, and as it grows in usage, brands that previously did well in organic and paid search will naturally see a reduction in leads and sales.
And SEOs are the single most experienced people to help brands traverse this new search world.
https://i0.wp.com/dubadosolutions.com/wp-content/uploads/2025/08/From-SEO-to-GEO-1I3gvw.webp?fit=1536%2C1024&ssl=110241536http://dubadosolutions.com/wp-content/uploads/2017/05/dubado-logo-1.png2025-08-12 13:00:002025-08-12 13:00:00The $1 trillion generative economy that smart SEOs will own
It looks like science, sounds legitimate, and can trick even seasoned marketers into believing they’ve found something real.
Daniel Kahneman once said people would rather use a map of the Pyrenees while lost in the Alps than have no map at all.
In SEO, we take it further: we use a map of the Pyrenees, call it the Alps, and then confidently teach others our “navigation techniques.”
Worse still, most of us rarely question the authorities presenting these maps.
As Albert Einstein said, “Blind obedience to authority is the greatest enemy of the truth.”
It’s time to stop chasing mirages and start demanding better maps.
This article shows:
How unscientific SEO research misleads us.
Why we keep falling for it.
What we can do to change that.
Spoiler: I’ll also share a prompt I created to quickly spot pseudoscientific SEO studies – so you can avoid bad decisions and wasted time.
The problems with unscientific SEO research
Real research should map the terrain and either validate or falsify your techniques.
It should show:
Which routes lead to the summit and which end in deadly falls.
What gear will actually hold under pressure.
Where the solid handholds are – versus the loose rock that crumbles when you need it most.
Bad research sabotages all of that. Instead of standing on solid ground, you’re balancing on a shaky foundation.
Take one common example: “We GEO’d our clients to X% more traffic from ChatGPT.”
These studies often skip a critical factor – ChatGPT’s own natural growth.
Between September 2024 and July 2025, chatgpt.com’s traffic jumped from roughly 3 billion visits to 5.5 billion – an 83% increase.
That growth alone could explain the numbers.
Yet these findings are repackaged into sensational headlines that flood social media, boosted by authoritative accounts with massive followings.
Most of these studies fail the basics.
They lack replicability and can’t be generalized.
Yet they are presented as if they are the definitive map for navigating the foggy AI mountain we’re climbing.
Let’s look at some examples of dubious SEO research.
AI Overview overlap studies
AI Overview overlap studies try to explain how much influence traditional SEO rankings have on appearing inside AI Overviews – often considered the new peak in organic search.
Since its original inception as Search Generative Experience (SGE), dozens of these overlap studies have emerged.
I’ve read through all of them – so you don’t have to – and pulled together my own non-scientific meta study.
My meta study: AI Overviews vs. search overlap
I went back to early 2024, reviewed every study I could find, and narrowed them down to 11 that met three basic criteria:
Comparison of URLs, not domains.
Measure the overlap of the organic Top 10 with the AI Overviews URLs.
Based on all URLs in the Top 10, not just 1.
The end result (sorted by overlap in %):
Overlap ranged from 5-77%
Average: 45.84%
Median: 46.40%
These huge discrepancies come down to a few factors:
Different numbers of keywords.
Different keyword sets in general.
Different time frames.
Likely different keyword types.
In summary:
Most studies focused on the U.S. market.
Only one provided a dataset for potential peer review.
Just two included more than 100,000 keywords.
And none explained in detail how the keywords were chosen.
There are only two noteworthy patterns across the studies:
Over time, inclusion in the organic Top 10 seems to make it more likely to rank in AI Overviews.
In other words, Google now seems to rely more heavily on Top 10 results for AI Overview content than it did in the early days.
If we exclude these studies (marked in the graph above) that didn’t disclose the number of keywords, we get this graph:
Ranking in the Top 10 correlates with being more likely to also rank in an AI Overviews.
That’s it. But even then, there are several reasons why these studies are generally flawed.
None of the studies uses a keyword set big enough: The results cannot be generalized, like mapping one cliff face and claiming it applies to the entire mountain range.
It’s not always clear what was measured: Some reports are promoted with obscure marketing material, and you wouldn’t understand them without the additional context – like a gear review that never mentions what type of rock it was tested on.
Too much focus on averages – and averages are dangerous: For one keyword type or niche, the overlap might be low. For others, it might be high. The average is in the middle. It’s like a bridge built for average traffic – handles normal loads fine, but collapses when the heavy trucks come.
Ignore query fan-out in the analysis: These studies give directions for where to go – too bad they’re driving a car while we’re in a boat. All major AI chatbots use query fan-out, yet none of the studies accounted for it.
This isn’t new knowledge. Google filed a patent for generative engine summaries in March 2023, stating that they also use search result documents (SRDs) that are:
Related-query-responsive.
Recent-query-responsive.
Implied-query-responsive.
Google may not have marketed this until May 2025, but it’s been in plain sight for over two years.
The real overlap of AI Overviews with Google Search depends on the overlap of all queries used, including synthetic queries.
If you can’t measure that, at least mention it as part of your limitations going forward.
Here are three more examples of recent SEO research that I find questionable.
Marketed as “wow, only 8-12% overlap between ChatGPT and Google Search Top 10 results,” this claim is actually based on just two queries repeated a few hundred times.
I seriously doubt the data provider considered this high-quality research.
Yet, despite its flaws, it’s been widely shared by creators.
A survey with only 1,000 people participating, 200 of them being marketers and small business owners – all of them using ChatGPT.
Yet, they promote the survey, stating that “77% of people in the U.S. use ChatGPT as a search engine.”
Why do we fall victim to these traps?
Not all SEO research is unscientific for the same reasons. I see four main causes.
Ignorance
Ignorance is like darkness.
At nighttime, it’s natural to have an impoverished sight.
It means “I don’t know better (yet).”
You are currently missing the capability and knowledge to conduct scientific research. It’s more or less neutral.
Stupidity
This is when you are literally incapable, therefore also neutral. You just can’t.
Few people are intellectually capable of working in a position to conduct research and then fail to do so.
Amathia (voluntary stupidity)
Worse than both is when the lights are on and you still decide not to see. Then you don’t lack knowledge, but deny it.
This is described as “Amathia” in Greek. You could know better, but actively seek out not to.
While all forms are dangerous, Amathia is the most dangerous.
Amathia resists correction, insists it is good, and actively misleads others.
Biases, emotions, hidden agendas, and incentives
You want to be right and can’t see clearly, or openly try to deceive others.
You don’t have to lie to not tell the truth. You can deceive yourself just as well as you can deceive others.
The best way to convince others of something is if you actually believe it yourself. We are masters at self-deception.
Few promote products/services they don’t believe in themselves.
You just don’t realize the tricks a paycheck plays on your perception of reality.
Reasons why we fall for bad research in SEO
We have the ability to open our minds more than ever before.
Yet, we decide to shrink ourselves down.
This is encouraged in part because of smartphones and social media, both induced by big tech companies, which are also responsible for the greatest theft of mankind (you could call it Grand Theft AI or GTAI).
“The thought process that went into building these applications, Facebook being the first of them, … was all about: ‘How do we consume as much of your time and conscious attention as possible?’ And that means that we need to sort of give you a little dopamine hit every once in a while. […] It’s a social-validation feedback loop … exactly the kind of thing that a hacker like myself would come up with, because you’re exploiting a vulnerability in human psychology.”
They don’t care what kind of engagement they get. Fake news that polarizes? Great, give it a boost.
Most people are stuck in this hamster wheel of being bombarded with crap all day.
The only missing piece? A middleman that amplifies. Those are content creators, publishers, news outlets, etc.
Now we have a loop.
Platforms where research providers publish questionable studies.
Amplifiers seeking engagement for personal gain.
Consumers overwhelmed by a flood of information are all flooded with data.
We are stuck in social media echo chambers.
We want simple answers, and we are mostly driven by our emotions.
A few other things that would improve most SEO research:
Peer reviews: Provide the dataset you used and let others verify your findings. That automatically increases the believability of your work.
Observable behavior: Focus less on what is said and more on what you can see. What people say is almost never what they truly feel, believe, or do.
Continuous observation: Search quality and AI vs. search overlap are constantly changing, so they should also be observed and studied continuously.
Rock-solid study design: Read a good book on how to do scientific research. (Consider the classic, “The Craft of Research.”) Implement aspects like having test and control groups, randomization, acknowledging limitations, etc.
I know that we can do better.
Reporting more accurately on SEO research – and news in general
Controversial and questionable studies gain traction through attention and a lack of critical thinking.
Responsibility lies not just with the “researchers” but also with those who amplify their work.
What might help bring more balance to the conversation?
Avoid sensationalism: It’s likely that 80% of people only read the headline, so while it has to be click-attractive, it should avoid being click-baity.
Read yourself: Don’t be a parrot of what other people say. Be very careful with AI summaries. Remember:
Check the (primary) sources: Whether it’s an AI chatbot or someone else reporting on something, always check sources.
Have a critical stance: There is naive optimism and informed skepticism. Always ask yourself, “Does this make sense?”
Value truth over being first. That’s journalism’s responsibility.
Avoid falling for bad SEO research
A curious mind is your best friend.
Socrates used to ask a lot of questions to expose gaps in people’s knowledge.
Using this method, you can uncover whether the researchers have solid evidence for their claims or if they are drawing conclusions that their data doesn’t actually support.
Here are some questions that are worth asking:
Who conducted the research?
Who are the people behind it?
What is their goal?
Are there any conflicts of interest?
What incentives could influence their judgment?
How solid is the methodology of the study?
What time frame was used for the study?
Did they have test and control groups and were they observing or surveying?
Under what criteria was the sample selected?
Are the results statistically significant?
How generalizable and replicable are the results?
Did they differentiate between geolocations?
How big was the sample size?
Do they talk about replicability and potential peer reviews?
In what way are they talking about limitations of their research?
It’s unlikely that you can ask too many questions and will end up drinking hemlock like Socrates.
Your research bulls*** detector
To leave you with something actionable, I built a prompt that you can use to assess research.
Copy the following prompt:
# Enhanced Research Evaluation Tool

You are a *critical research analyst. Your task is to evaluate a research article, study, experiment, or survey based on **methodological integrity, clarity, transparency, bias, reliability, and **temporal relevance*.

---

## Guiding Principles

- Always *flag missing or unclear information*.
- Use *explicit comments* for *anything ambiguous* that requires manual follow-up.
- Don't add emojis to headlines unless provided in the prompt.
- Apply *domain-aware scrutiny* to *timeliness. In rapidly evolving fields (e.g., AI, genomics, quantum computing), data, tools, or models older than **12–18 months* may already be outdated. In slower-moving disciplines (e.g., historical linguistics, geology), older data may still be valid.
- Use your own corpus knowledge to assess what counts as *outdated*, and if uncertain, flag the timeframe as needing expert verification.
- 📈 All scores use the same logic:
  ➤ *Higher = better*
  ➤ For bias and transparency, *higher = more transparent and reliable*
  ➤ For evidence and methodology, *higher = more rigorous and valid*

- *AI-specific guidance*:
   - Use of *GPT-3.5 or earlier (e.g., GPT-3.5 Turbo, DaVinci-003)* after 2024 should be treated as *outdated unless explicitly justified*.
   - Models such as *GPT-4o, Claude 4, Gemini 2.5* are considered current *as of mid 2025*.
   - *Flag legacy model use* unless its relevance is argued convincingly.

---

## 1. Extract Key Claims and Evidence

| *Claim* | *Evidence Provided* | *Quote/Passage* | *Supported by Data?* | *Score (1–6)* | *Emoji* | *Comment* |
|----------|------------------------|--------------------|-------------------------|------------------|-----------|-------------|
|          |                        |                    | Yes / No / Unclear      |                  | 🟥🟧🟩       | Explain rationale. Flag ambiguous or unsupported claims. |

*Legend* (for Claims & Evidence Strength):
🟥 = Weak (1–2) 🟧 = Moderate (3–4) 🟩 = Strong (5–6) Unclear = Not Provided or Needs Review
📈 Higher score = better support and stronger evidence

---

## 2. Evaluate Research Design and Methodology

| *Criteria* | *Score (1–6)* | *Emoji* | *Comment / Flag* |
|--------------|------------------|-----------|---------------------|
| Clarity of hypothesis or thesis                        |          | 🟥🟧🟩 |             |
| Sample size adequacy                                    |          | 🟥🟧🟩 |             |
| Sample selection transparency (e.g., age, location, randomization) | | 🟥🟧🟩 |         |
| Presence of test/control groups (or clarity on observational methods) | | 🟥🟧🟩 |       |
| *Time frame of the study (data collection window)*    | ? / 1–6 | Unclear / 🟥🟧🟩 | If not disclosed, mark as Unclear. If disclosed, assess whether the data is still timely for the domain. |
| *Temporal Relevance* (Is the data or model still valid?) | ? / 1–6 | Unclear / 🟥🟧🟩 | Use domain-aware judgment. For example:
   - AI/biotech = < 12 months preferred
   - Clinical = within 3–5 years
   - History/philosophy = lenient
   - For AI, if models like *GPT-3.5 or earlier* are used without explanation, flag as outdated. |
| Data collection methods described                       |          | 🟥🟧🟩 |             |
| Statistical testing / significance explained            |          | 🟥🟧🟩 |             |
| Acknowledgment of limitations                           |          | 🟥🟧🟩 |             |
| Provision of underlying data / replicability info       |          | 🟥🟧🟩 |             |
| Framing and neutrality (no sensationalism or suggestive language) | | 🟥🟧🟩 |   |
| Bias minimization (e.g., blinding, naturalistic observation) |      | 🟥🟧🟩 |             |
| Transparency about research team, funders, affiliations |          | 🟥🟧🟩 |             |
| Skepticism vs. naive optimism                           |          | 🟥🟧🟩 |             |

*Legend* (for Methodology):
🟥 = Poor (1–2) 🟧 = Moderate (3–4) 🟩 = Good (5–6) Unclear = Not Specified / Requires Manual Review
📈 Higher score = better design and methodological clarity

---

## 3. Bias Evaluation Tool

| *Bias Type* | *Score (1–6)* | *Emoji* | *Comment* |
|---------------|------------------|-----------|-------------|
| Political Bias or Framing            |          | 🟥🟧🟩 |             |
| Economic/Corporate Incentives       |          | 🟥🟧🟩 |             |
| Ideological/Advocacy Bias           |          | 🟥🟧🟩 |             |
| Methodological Bias (design favors specific outcome) | | 🟥🟧🟩 |     |
| Lack of Disclosure or Transparency  |          | 🟥🟧🟩 |             |

*Legend* (for Bias):
🟥 = Low transparency (1–2) 🟧 = Moderate (3–4) 🟩 = High transparency (5–6)
📈 Higher score = less bias, more disclosure

---

## 4. Summary Box

### Scores

| *Category*                  | *Summary* |
|------------------------------|-------------|
| *Average Methodology Score* | X.X / 6 🟥🟧🟩 (higher = better) |
| *Average Bias Score*        | X.X / 6 🟥🟧🟩 (higher = better transparency and neutrality) |
| *Judgment*        | ✅ Trustworthy / ⚠ Needs Caution / ❌ Unreliable |
| *Comment*  | e.g., “Study relies on outdated models (GPT-3.5),” “Time window not disclosed,” “Highly domain-specific assumptions” |

---

### 👍 Strengths
- ...
- ...
- ...

### 👎 Weaknesses
- ...
- ...
- ...

### 🚩 Flag / Warnings
- ...
- ...
- ...
Potential biases that are visible in the research.
A summary box with strengths, weaknesses, and potential flags/warnings.
This study scores high as it follows a robust scientific methodology. The researchers even provided their dataset. (I checked the link.)
Important notes:
An analysis like this doesn’t replace taking a look yourself or thinking critically about the information presented. What it can do, however, is to give you an indication if what you’re reading is inherently flawed.
If the researchers include some form of prompt injection that is supposed to manipulate an evaluation, you could get a wrong evaluation.
That said, working with a structured prompt like this will yield much better results than “summarize this study briefly.”
Want better, more honest SEO research? Look at the person in the mirror
SEO is not deterministic – it’s not predictable with a clear cause-and-effect relationship.
Most of what we do in SEO is probabilistic.
Uncertainty and randomness always play a part, even though we often don’t like to admit it.
As a result, SEO research can’t and doesn’t have to meet other disciplines’ standards.
But the uncomfortable truth is that our industry’s hunger for certainty has created a marketplace for false confidence.
We’ve built an ecosystem where suspect research gets rewarded with clicks and authority while rigorous honesty gets ignored, left alone in the dark.
The mountain we’re climbing isn’t getting any less foggy.
But we can choose whether to follow false maps or build better ones together.
Science isn’t always about having all the answers – it’s about asking better questions.
I like to say that changing someone else’s behavior and standards takes time.
In contrast, you can immediately change yours. Change begins with the person in the mirror.
Whether you conduct, report, or consume SEO research.
https://i0.wp.com/dubadosolutions.com/wp-content/uploads/2025/08/Meta-study-AI-Overviews-vs.-search-overlap-2sLAQL.webp?fit=1280%2C1600&ssl=116001280http://dubadosolutions.com/wp-content/uploads/2017/05/dubado-logo-1.png2025-08-12 12:00:002025-08-12 12:00:00Most SEO research doesn’t lie – but doesn’t tell the truth either
We just introduced two new updates to Yoast SEO Premium that focus on clarity and speed. Yoast SEO Redirect Manager just got a cleaner, more user-friendly workspace. After heavy testing, Yoast AI Optimize is now available for the Classic Editor. It helps you optimize your copy for readability and SEO without disrupting your workflow or website performance.
Redirects, made simpler
The Redirect Manager helps you prevent errors like 404s and 410s by automatically prompting you to create redirects when you move or delete content. The core functionality remains the same. The new design makes redirect management easier and clearer.
Here’s a quick reminder of what the Redirect Manager helps you do:
Quickly set up and manage redirects without digging through menus
See exactly where each redirect starts and ends
Import and export multiple redirects in bulk using CSV files
Apply advanced regex rules to support more complex setups, such as full migrations
Whether you’re making small updates or handling a major restructuring, everything is easier to manage. No extra tools or technical steps required. It’s all built into your Yoast SEO Premium.
Yoast AI Optimize in the Classic Editor
Yoast AI Optimize brings smart, targeted SEO support into your writing flow. After heavy testing, we extended it to the Classic Editor. Improvements are easy to review and apply, and the final decision stays within the editor, under your complete control.
Optimize faster, keep your control:
Get real-time AI suggestions that help improve SEO and readability
Edit suggestions to match your style and tone of voice
Apply or dismiss suggestions easily without breaking your writing flow
Use it in both the Classic and Block editors with Yoast SEO Premium
Supports optimization for:
Keyphrase in introduction
Keyphrase distribution
Keyphrase density
Sentence length
Paragraph length
Yoast AI Optimize helps improve SEO scores faster while keeping a natural writing style, in both the Classic and Block editors.
A smarter analysis in Yoast SEO Premium
Yoast SEO Premium has a smart content analysis that helps you take your content to the next level!
http://dubadosolutions.com/wp-content/uploads/2017/05/dubado-logo-1.png00http://dubadosolutions.com/wp-content/uploads/2017/05/dubado-logo-1.png2025-08-12 08:37:022025-08-12 08:37:02 A smoother Redirect Manager and Yoast AI Optimize for Classic Editor